Tag: bicone crystals (Page 4 of 8)

FREE Beading Pattern for Madelyn Necklace

This is my latest design, which requires Superduos, 4mm and 6mm pearls or crystals, and 11/0 seed beads. The pattern diagram shows how the necklace is made in 4 rows, back and forth (the 2nd and 3rd rows being quicker than the first and last). The great thing about this pattern is that it works equally well with either larger TOHO 11/0 seed beads (like the gold/white/pink piece), or smaller Czech 11/0 seed beads (like the grey/blue piece). This pattern produces a curve that works best for shorter necklaces (15 – 20 inches), but probably not much longer than that. What I love best about this design are the lacy curves, which are not always easily achieved with netting techniques. I hope you enjoy this free beading pattern. (I plan to post a pattern for matching earrings in my next post). Have fun experimenting with different colors!
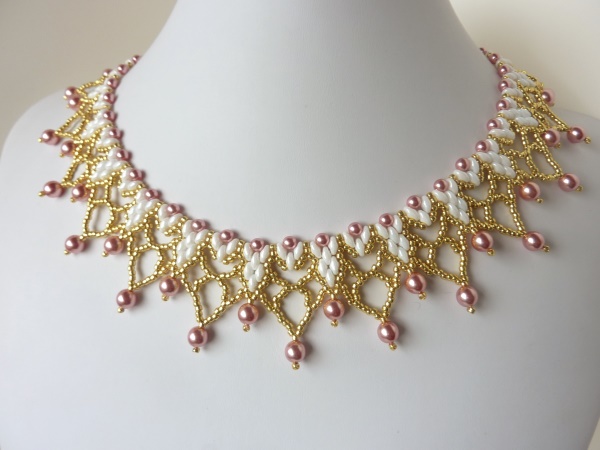
FREE beading pattern: Madelyn Necklace

The materials used for the white/pink/gold piece were white Superduos, 4mm and 6mm Light Coral Czech Glass Pearls (from Jill Wiseman Designs), and gold TOHO 11.0 seed beads.

The materials used for the blue/grey piece were crystal blue luster Superduos, 4mm and 6mm bicone AB blue crystals, and black hematite 11/0 Czech seed beads.

Click on the photos below (or the free beading pattern) to zoom in.

If you wish to print the pattern, download it in PDF format:


If you enjoy the free designs, tutorials, and downloads provided by BeadDiagrams.com, consider donating using Paypal!

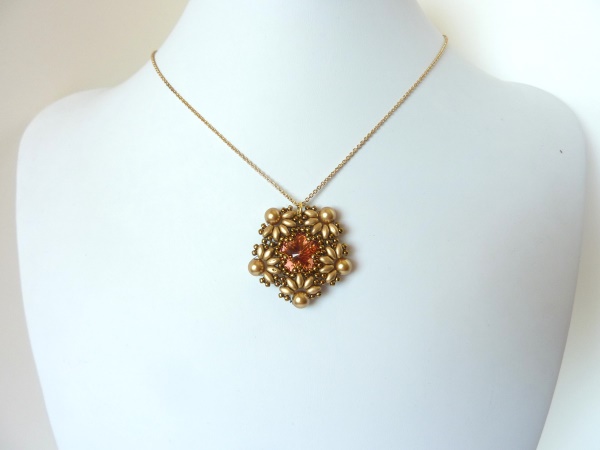
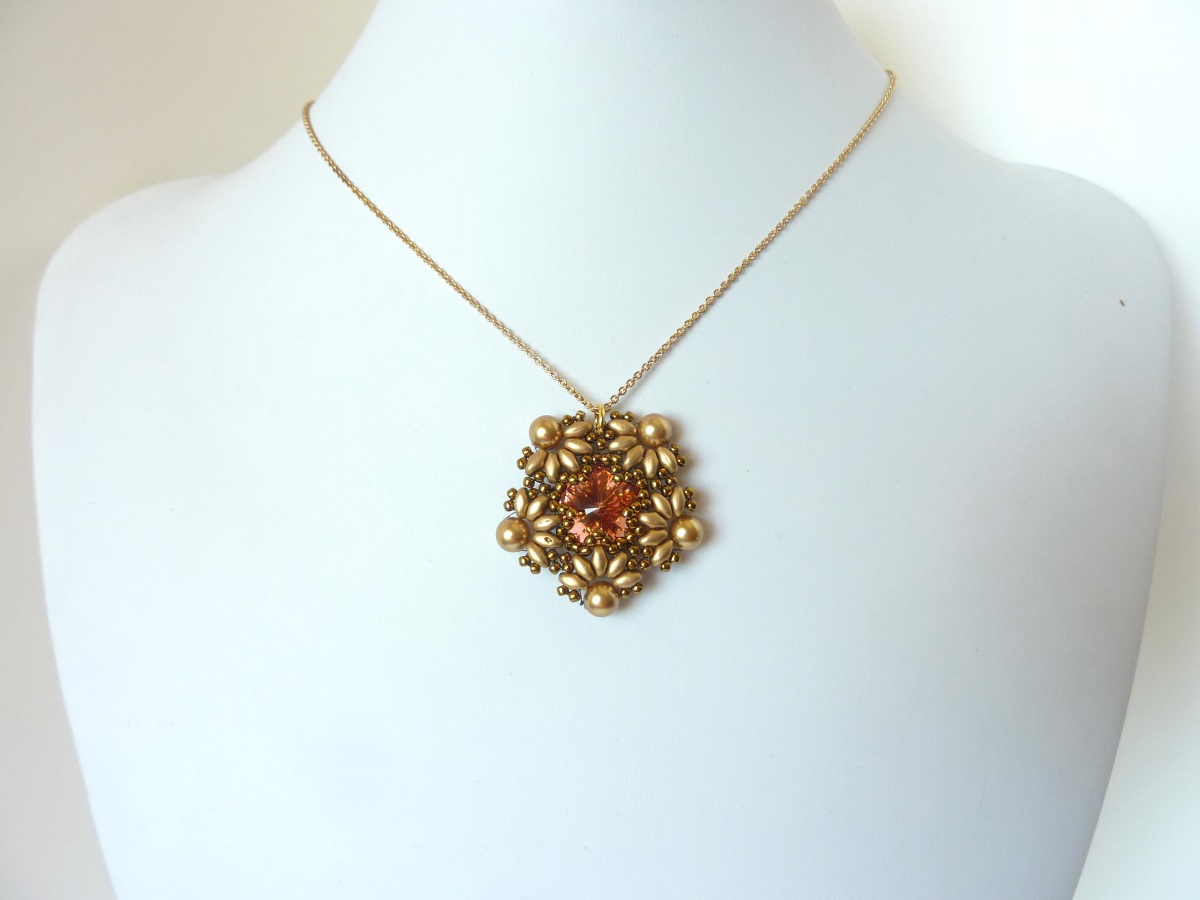
FREE beading pattern for Pentagon Rivoli Pendant

This is a lovely pendant design, which features a crystal rivoli inside a 5-pointed floral frame.  The pattern requires a 14mm crystal rivoli, 6mm pearls or bicone crystals, Superduo beads, 11/0 seed beads, and jewelry glue for the last step.  I experimented with larger (TOHO) and smaller (Czech) 11/0 seed beads, and both seemed to work equally well.  I included a step at the end to glue the the rivoli back to its beaded cage in the back, because I found that with some of the pieces I made, the rivoli could pop out if you twisted the component hard enough. I used E6000 clear glue for that step (same as pictured in the Materials photo in my DIY Sweater Clip post).  I was able to string the pendant on a chain by inserting a jump ring through the middle of one of the sides of the finished piece.   I hope you enjoy this free beading pattern!

FREE beading pattern: Pentagon Rivoli Pendant

FREE beading pattern: Pentagon Rivoli Pendant

Click on the photos below (or the free beading pattern) to zoom in.

If you wish to print the pattern, download it in PDF format:


If you enjoy the free designs and downloads provided by BeadDiagrams.com, consider donating! (Just click the “Donate” button on the right sidebar to donate using PayPal).

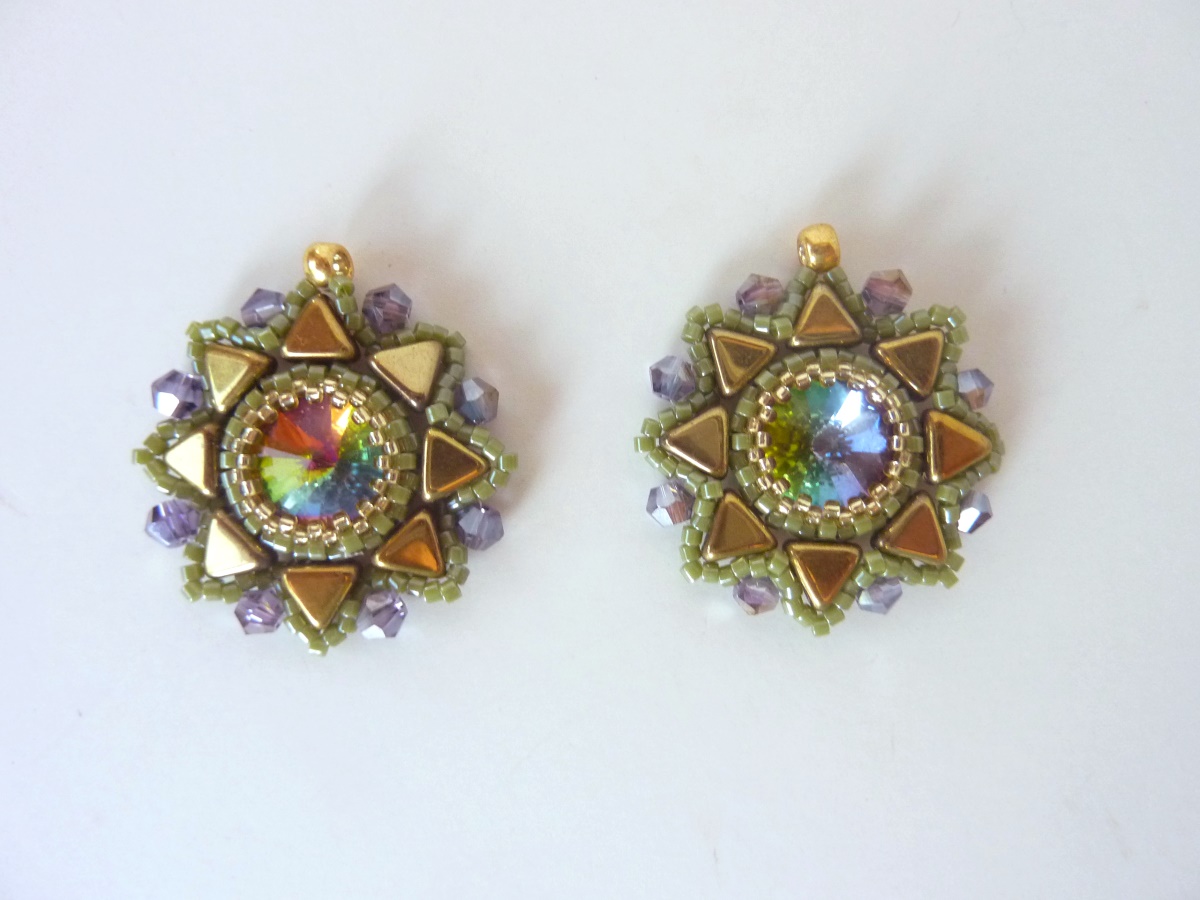
FREE beading pattern for Sunburst Rivoli Earrings

This is an earring pattern to coordinate with the Sunburst Rivoli Pendant in my last post.  Each component requires a 12mm rivoli, 2-hole triangle beads, 4mm bicone crystals, with 15/0 and 11/0 Miyuki seed beads.  I tried this pattern with Czech 11/0 seed beads in the aqua/silver piece below, which did work, but the Miyuki’s were a bit more uniform and worked a bit better.  The 6/0 or 8/0 seed bead at the top allows you to loop a jump ring through so the component can be attached to an ear clip or hook, but this is optional if you prefer to glue a post to the back instead.  I hope you enjoy this free beading pattern!

FREE beading pattern: Sunburst Rivoli Earrings

FREE beading pattern: Sunburst Rivoli Earrings

Click on the photos below (or the free beading pattern) to zoom in.

If you wish to print the pattern, download it in PDF format:


If you enjoy the free designs and downloads provided by BeadDiagrams.com, consider donating! (Just click the “Donate” button on the right sidebar to donate using PayPal).

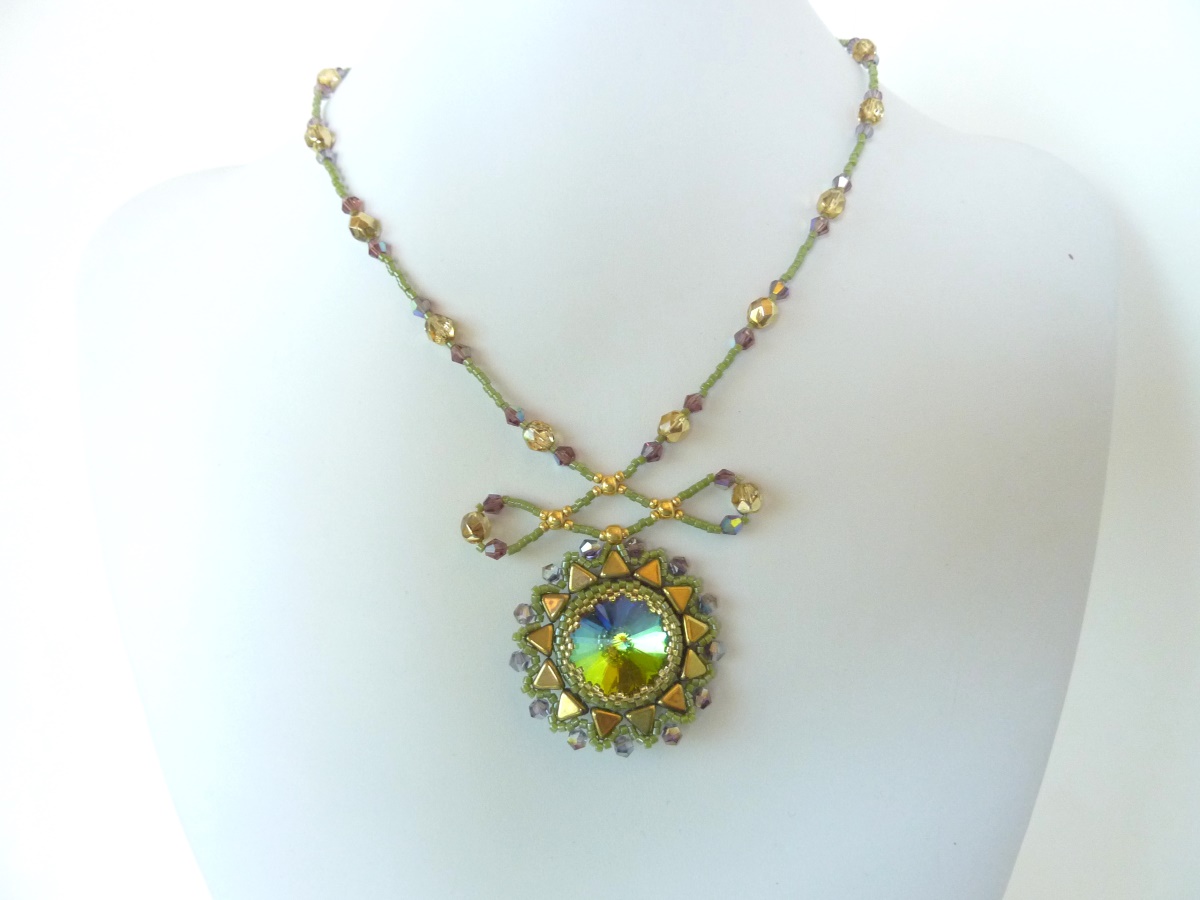
FREE beading pattern for Sunburst Rivoli Pendant

This is my first experiment with 2-hole triangle beads, as well as my first design using a large (20mm) rivoli.  This pattern only works with 11/0 Miyuki seed beads, and also requires 15/0 seed beads and 4mm crystals.  I strung the pendant on 0.015in beading wire, making two loops  through 6/0 seed beads to create a “bow” shape above the pendant.  To match the strung part of the necklace with the pendant, I used 6mm crystals the same color as the 2-hole triangle beads.  (Although the diagram only includes steps for making the pendant, you can examine the photos to determine stringing pattern for the rest of the necklace).  The pendant can also be hung on a cord, chain, or ribbon instead, if desired.  I hope you enjoy this free beading pattern!

FREE beading pattern: Sunburst Rivoli Pendant

FREE beading pattern: Sunburst Rivoli Pendant

Click on the photos below (or the free beading pattern) to zoom in.

If you wish to print the pattern, download it in PDF format:


If you enjoy the free designs and downloads provided by BeadDiagrams.com, consider donating! (Just click the “Donate” button on the right sidebar to donate using PayPal).

FREE beading pattern for Wire Loop Cross

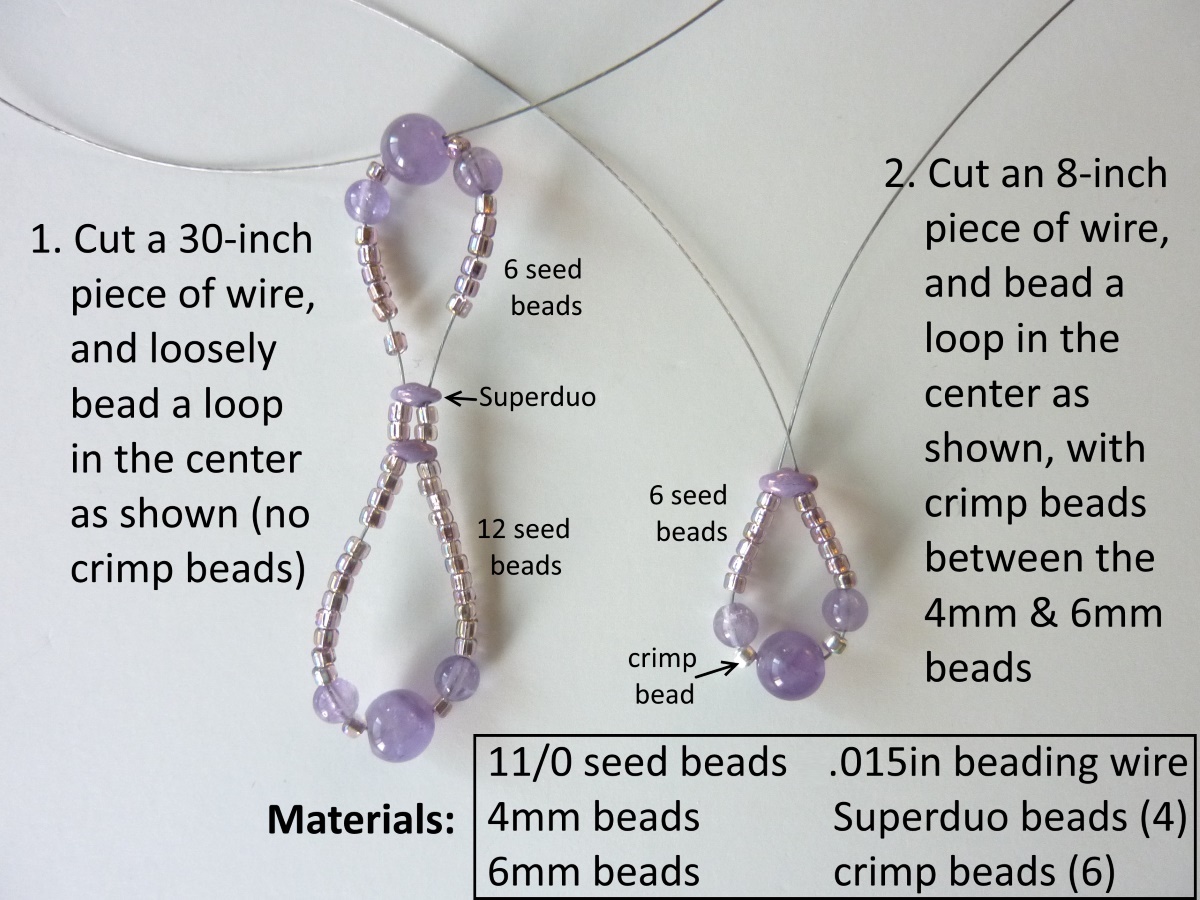
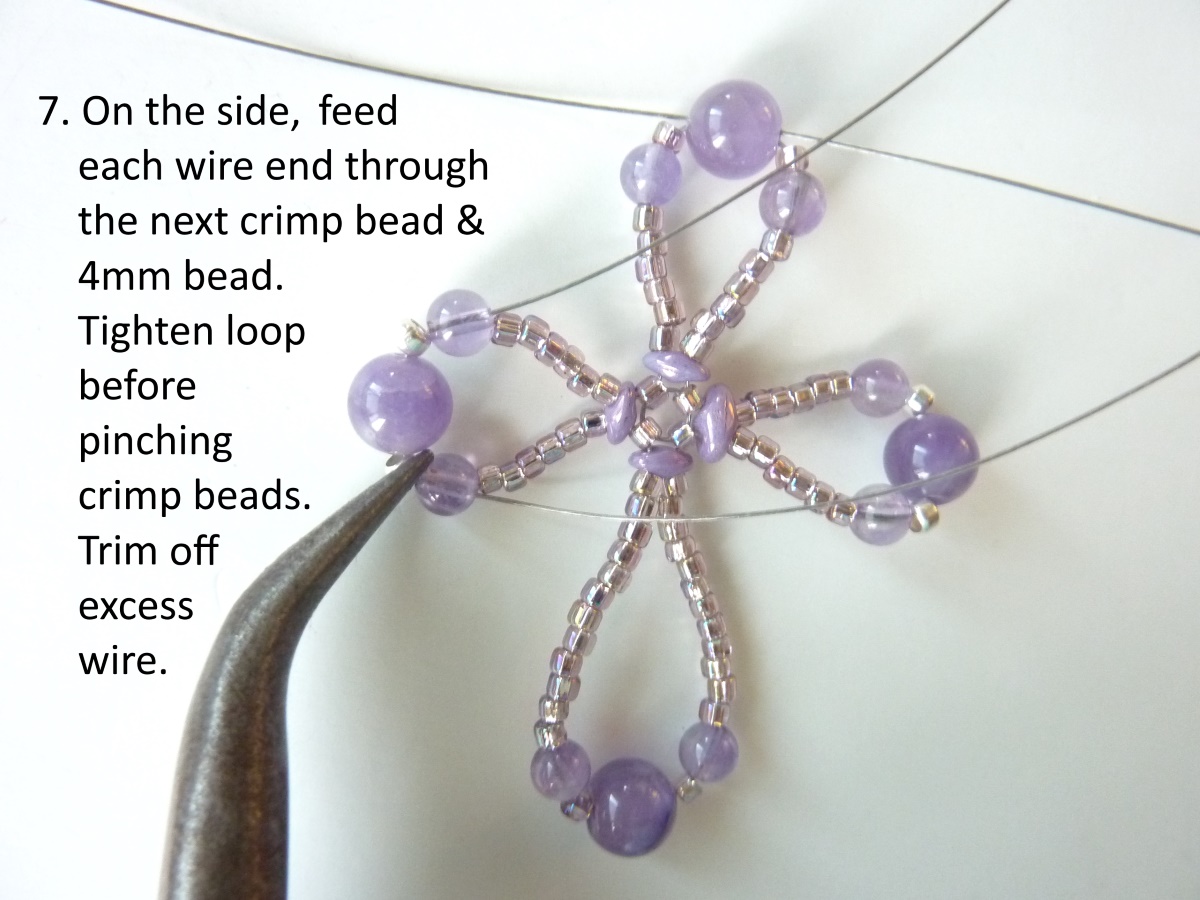
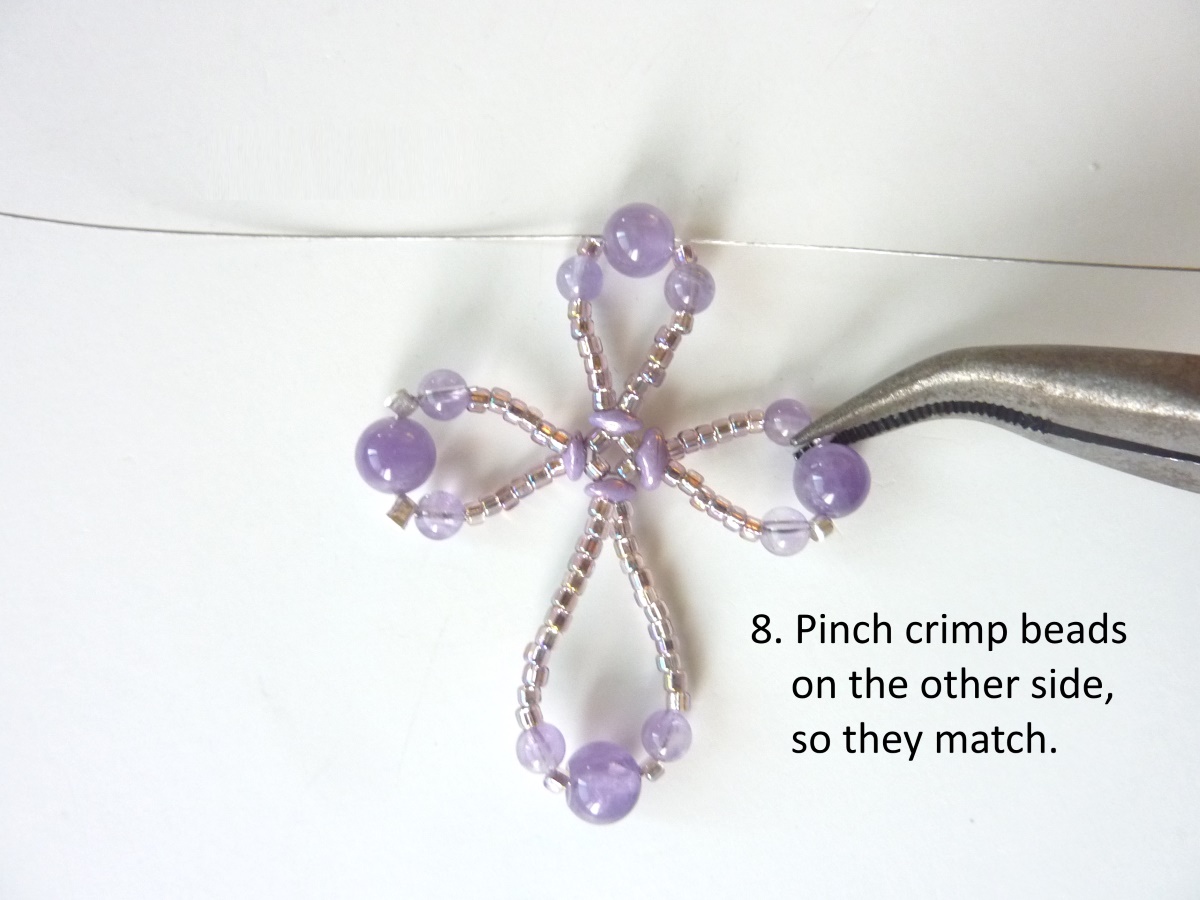
This wire loop cross pendant and necklace is made as a single interconnected piece, and looks fabulous as a short necklace.  It is made using bead stringing wire (0.015in, 0.38mm), crimp beads (6), 11/0 seed beads, 4mm and 6mm round beads, and 4 Superduo beads for the center of the cross.  Instead of transcribing this pattern as a diagram, I decided to create more of a picture tutorial in hopes it would be easier to follow.  This piece can be made fairly quickly, so I was able to make many of them to experiment with different color combinations.  You can use crimping pliers to crimp the beads at steps 7, 8, and 11, but I found just pinching the crimps flat with needle-nose pliers worked just as well, and was easier to do.  I hope you enjoy this free beading pattern!

FREE beading pattern: Wire Loop Cross

FREE beading pattern: Wire Loop Cross

Click on the photos below to zoom in.

The following photos demonstrate how to make this piece, step by step.

Wire Loop Cross: steps 1 and 2

Wire Loop Cross: steps 1 and 2

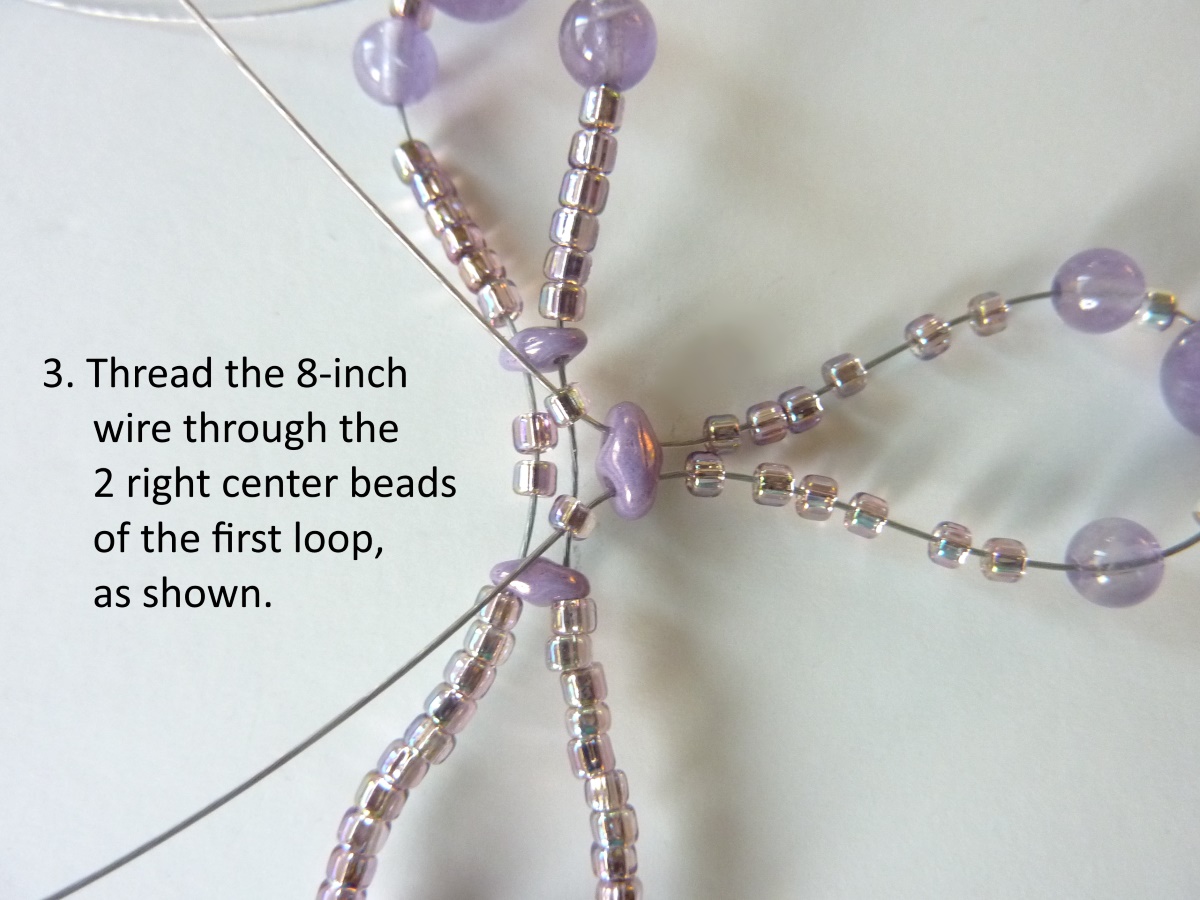
Wire Loop Cross: step 3

Wire Loop Cross: step 3

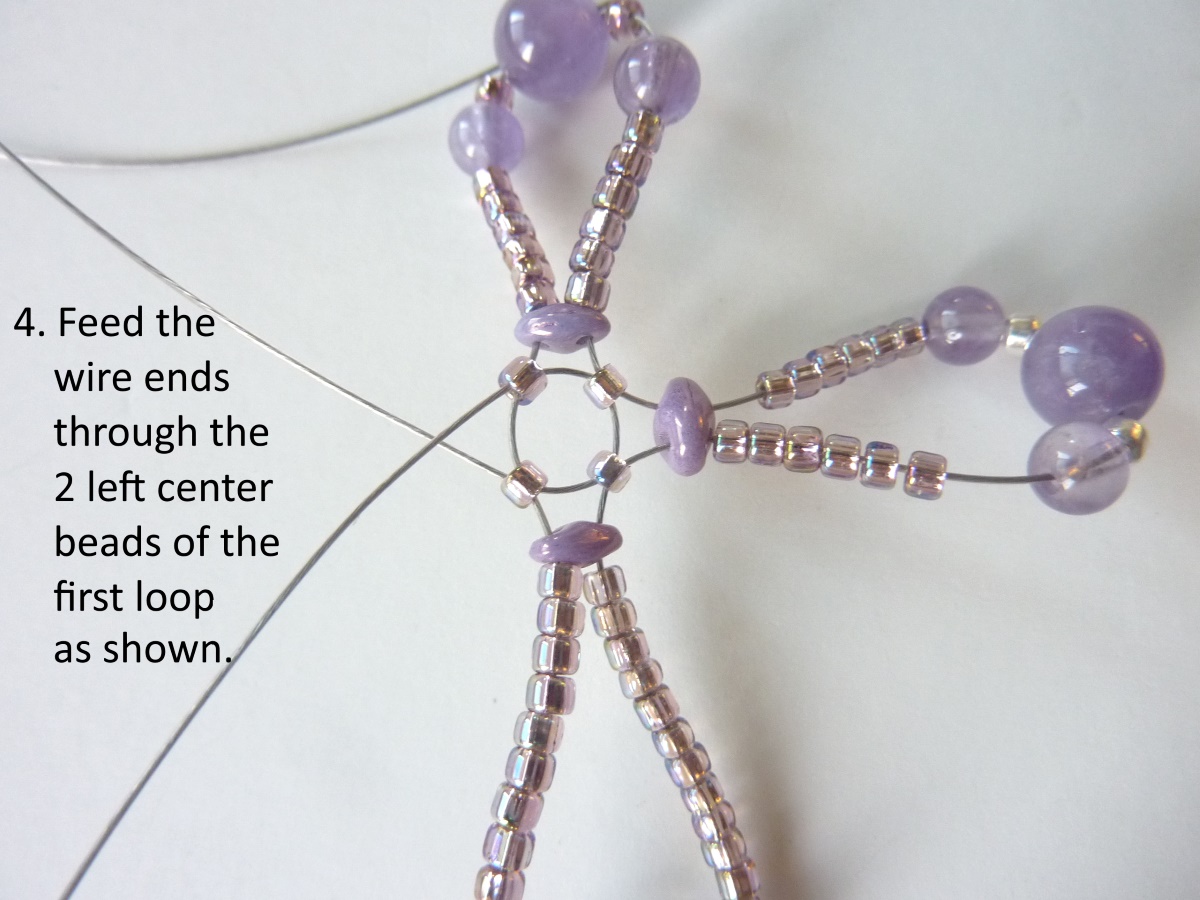
Wire Loop Cross: step 4

Wire Loop Cross: step 4

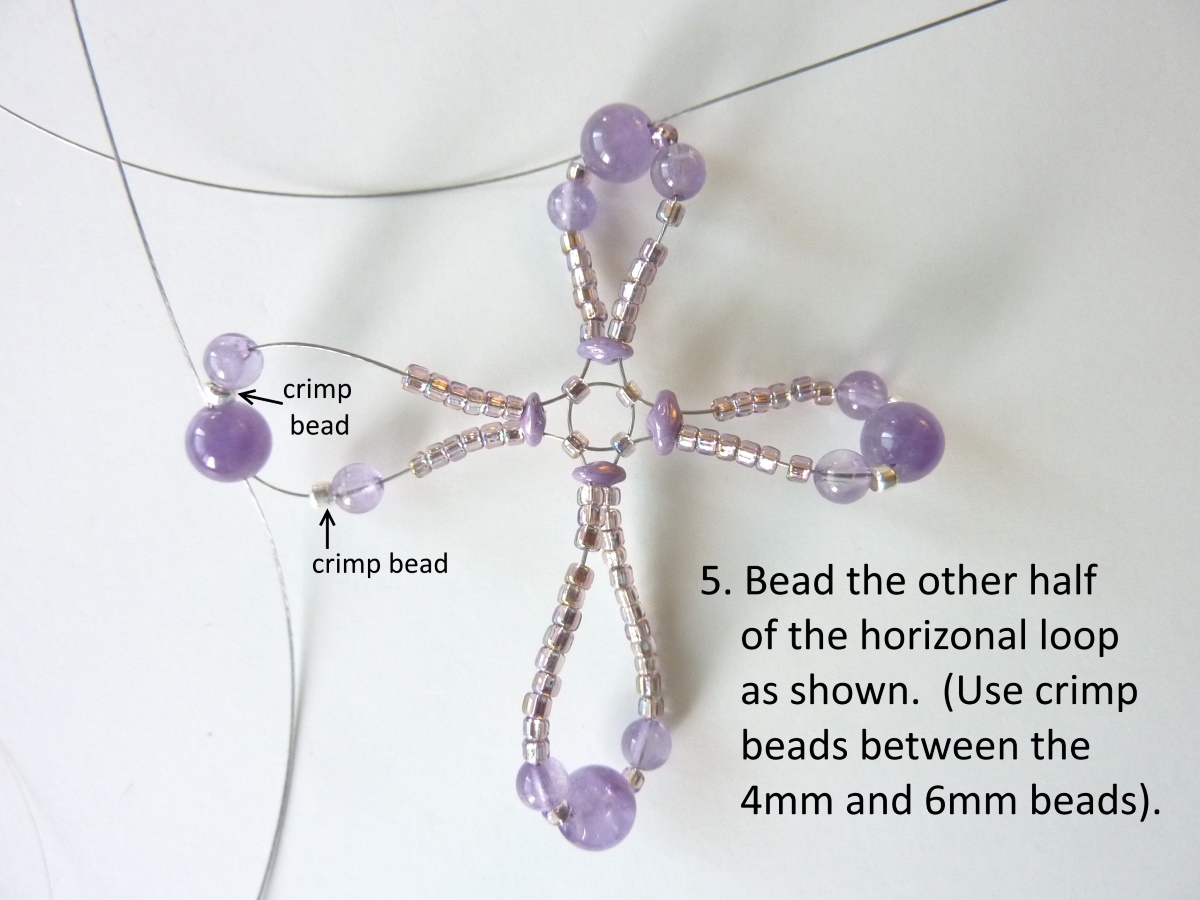
Wire Loop Cross: step 5

Wire Loop Cross: step 5

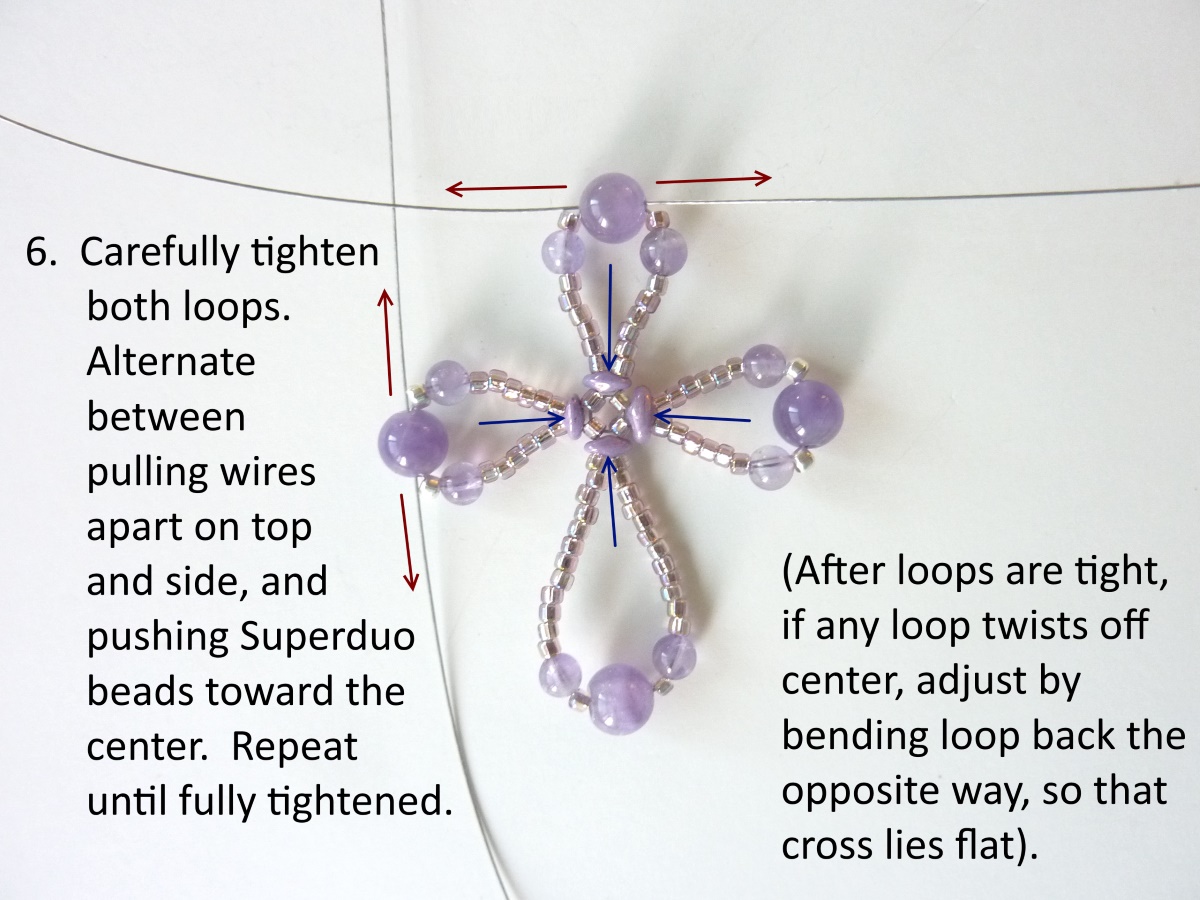
Wire Loop Cross: step 6

Wire Loop Cross: step 6

Wire Loop Cross: step 7

Wire Loop Cross: step 7

Wire Loop Cross: step 8

Wire Loop Cross: step 8

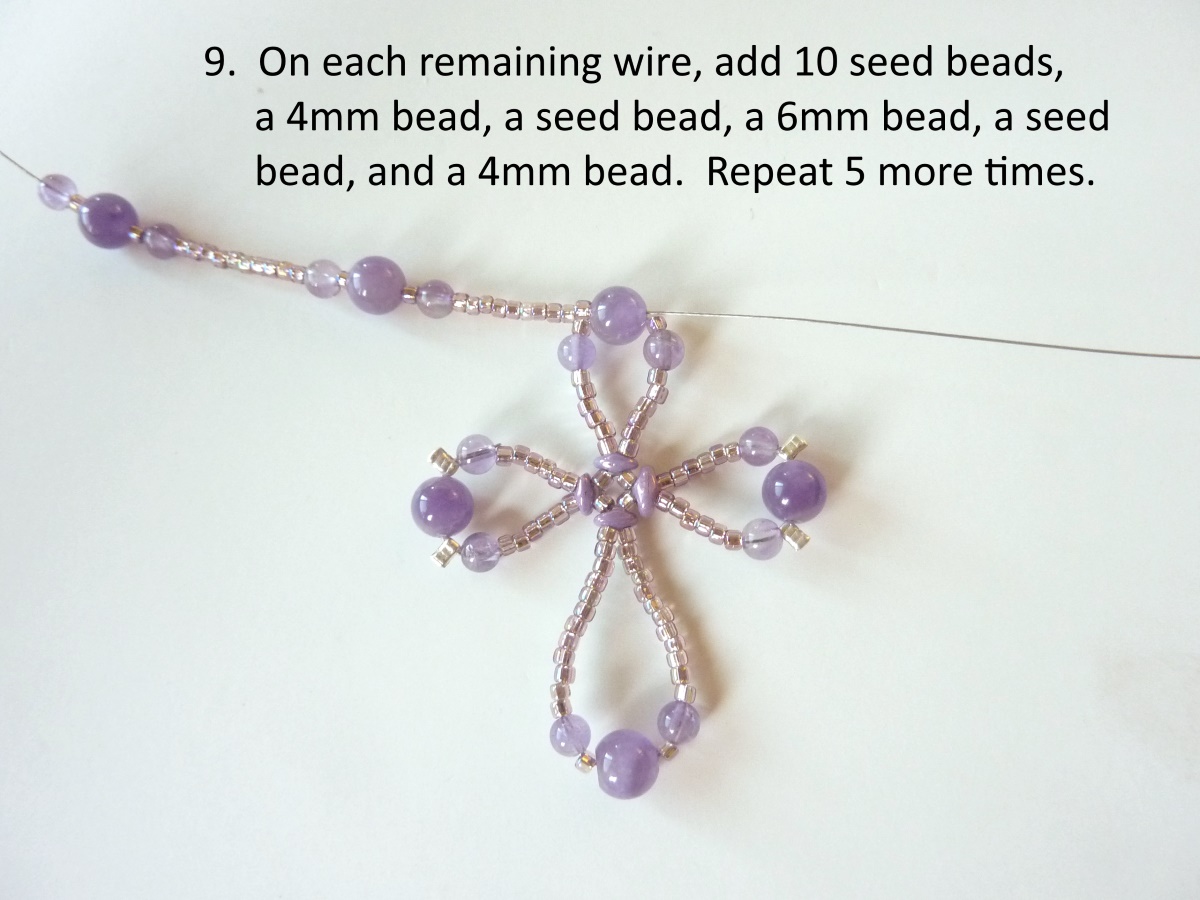
Wire Loop Cross: step 9

Wire Loop Cross: step 9

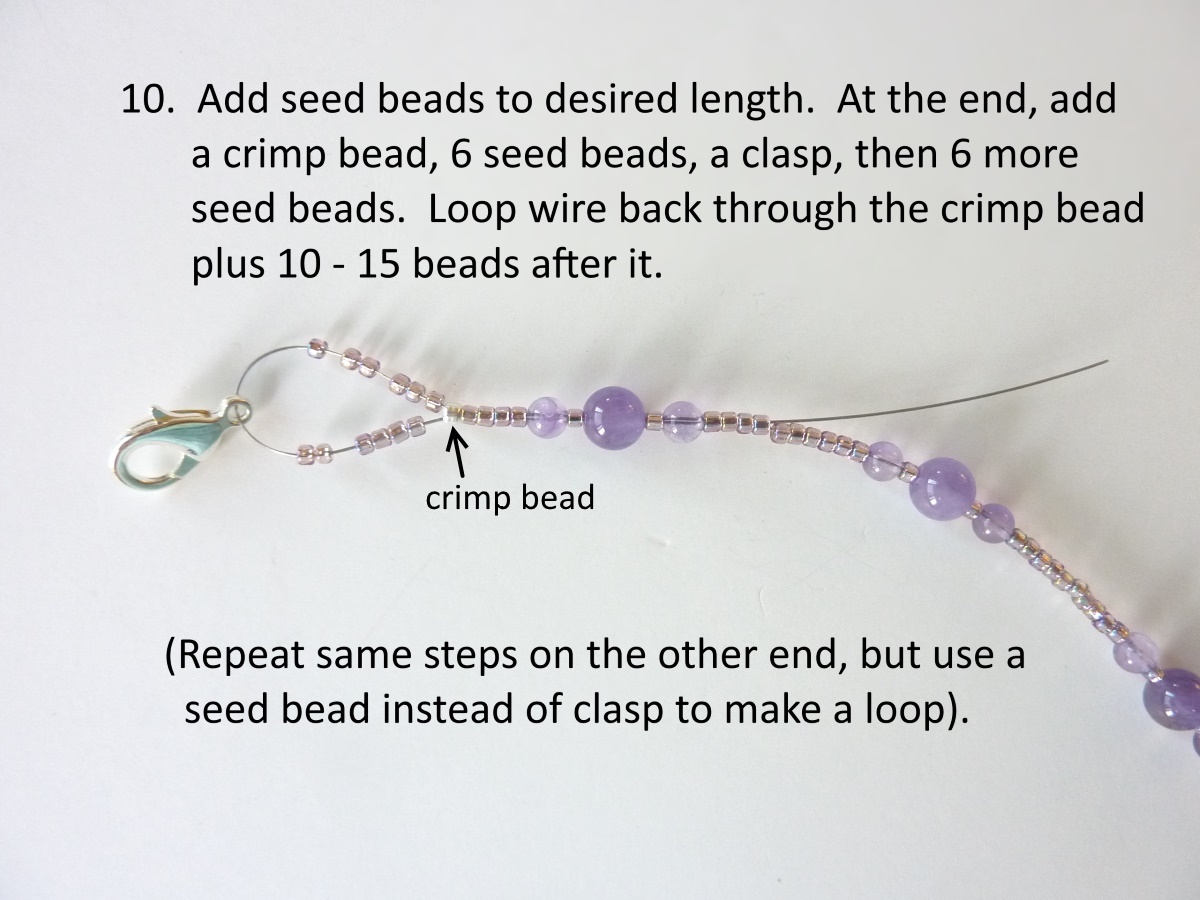
Wire Loop Cross: step 10

Wire Loop Cross: step 10

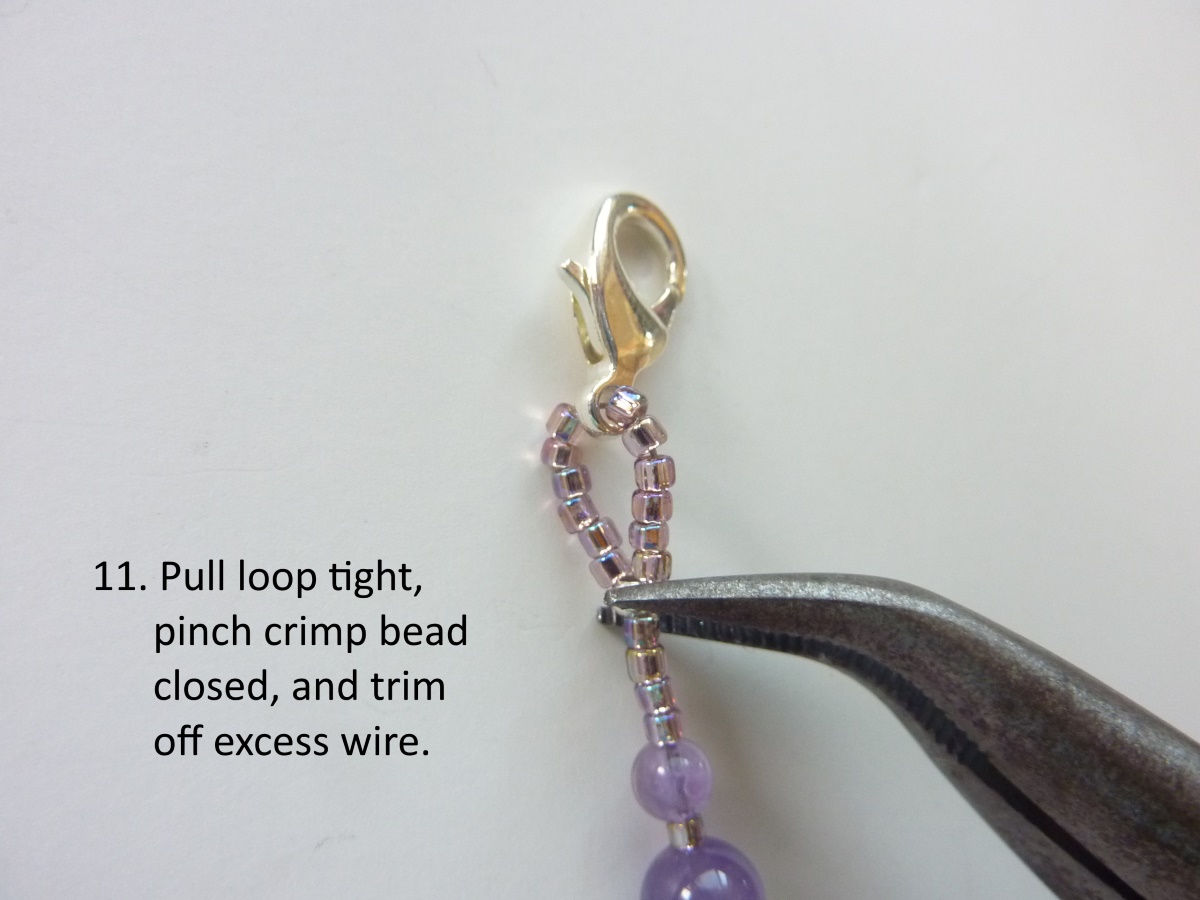
Wire Loop Cross: step 11

Wire Loop Cross: step 11

« Older posts Newer posts »

© 2024 BeadDiagrams.com

Theme by Anders NorenUp ↑

Ads Blocker Image Powered by Code Help Pro

Ads Blocker Detected!!!

We have detected that you are using extensions to block ads. Please support us by disabling these ads blocker.

Powered By
Best Wordpress Adblock Detecting Plugin | CHP Adblock