Gallery of FREE Beading Patterns

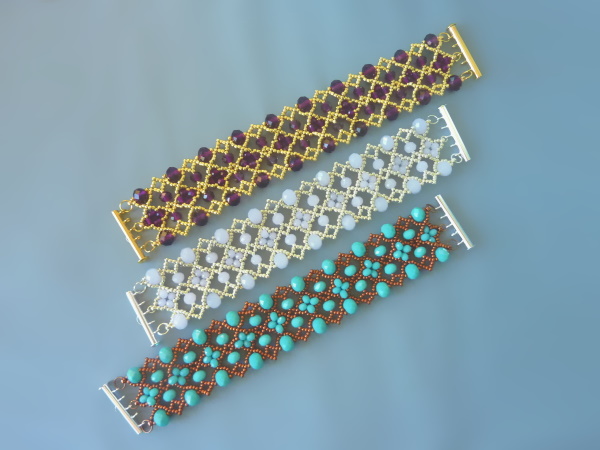
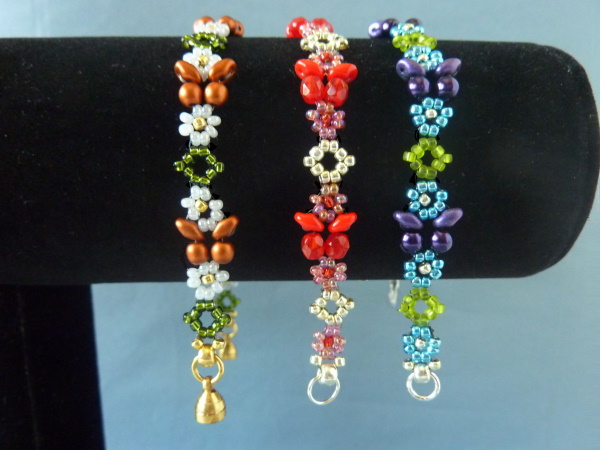
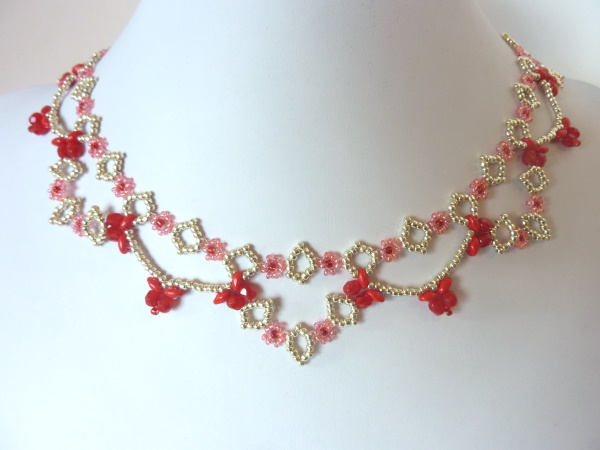
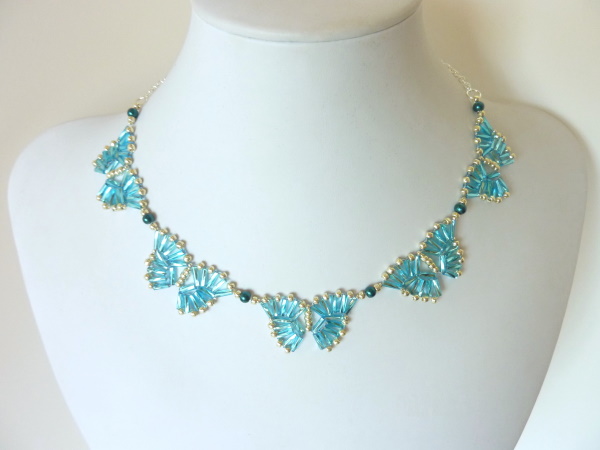
This page is provided as a convenient way to browse and navigate to all of the patterns available at BeadDiagrams.com. This is essentially an “index gallery” of the free beading designs that have been posted.

Please remember these designs are intended to inspire your beading, and are primarily for personal use and teaching. If you wish to sell pieces made from these patterns, please give design credit to BeadDiagrams.com or Anne Lazenby.

Enjoy!

FREE beading pattern: Chip Statement Necklace

FREE beading pattern: Chip Statement Necklace

Click on the photos below (or the free beading pattern) to zoom in.

The original inspiration for this piece was a sale at Hobby Lobby, specifically this Metal Gallery piece:

I thought this would be great as a focal point, with some natural stone. I have both drilled medium chips and round beads made of natural stone, so wanted to incorporate those somehow. I thought having the chips as a backdrop to the focal piece would be great, but they are too heavy to make an entire necklace out of with enough width for the focal piece to lay on top of. Plus I only had 30 inches or so of each chip variety. So what I finally came up with was more of a method than a pattern, which is easier to show with a mix of pictures and diagrams. Usually my PDF patterns are 1 page, but this one is 5 pages, to illustrate this method with images.

This pattern requires two 8/0 seed beads and jump rings for clasp, 11/0 seed beads, 4-mm round beads, 30-inches of medium drilled chip beads, and (optionally) a 1 1/2″ focal piece or bead (with 5 inches of 20-guage wire to attach).

I started by making 2 end pieces (each in an L-shape) to frame the center chip section (shown in steps 1 – 10 below).

Steps 1 – 10

Then I added some decorative stability strands (with accent color), so the end components would keep their shape with the weight of the chips added later. The first outer strand is made of alternating 4mm round beads and seed beads, and should measure 3″ – 3 1/16″ long, connecting from the last vertical diamond, to the 9th horizontal diamond from the right. This ended up being 13 round beads for the aqua/gold piece pictured below, but 14 for the blue/silver piece (as the size of 4mm beads can vary).

Step 11

Connect the strand at the 9th horizontal diamond from the right (see diagram below, step 12). After step 12, the 2nd strand should measure 2 1/4″, and connect from the 7th horizontal diamond from the right to the 4th vertical diamond. This ending up being 9 round beads for the aqua/gold piece pictured below, but 10 for the blue/silver piece. (I adjusted the strand to the right length by adding an extra seed bead on the end, which can be done with any of the strands).

Steps 12, 14, and 15
Step 13

When diamond links are at 90 degrees, the 3 longer strands will have some slack.

When you pull it apart past 90 degrees (as the gravity of the chip beads will do), the four strands should all be straight.

Next, string on 5 inches of chips.

Step 16

Connect it to the other end component, per diagram below:

Step 17

After connecting first row of chips, connect clasp with jump rings through 8/0 seed beads at either end, and place on a necklace display bust. (The weight of the chips can affect how long each of the next four chip strands will be, so it is good to finish the necklace while it is on the display bust).

Before step 18 (1st strand of chips)

As you add chip strands, ensure they are the right length so they lie close together without gaps or overlapping. (Step 18 indicates what these lengths were for my chips).

Step 18 (2nd strand of chips)
Step 18

After the 5th strand, the weight of the chips will pull the end component strands straight. This can be the finished necklace, or you can continue to add a focal piece on top of the chips.

Finished chip section (after step 18)

For the focal piece, first put about 5 inches of 20-guage wire through the focal bead, and bend the ends 90 degrees back on both sides.

Step 19

Put the necklace on the display bust backwards, then place the focal bead behind it. Be sure it is in the center.

Step 20

Bend the wires down with your thumbs, in between the chip beads. Use round nose pliers to curl the wire ends inward so they don’t poke out.

Step 21

Put the necklace back on the display bust frontward, showing the focal piece. Enjoy the finished piece!

Chip Statement Necklace

If you wish to print the pattern, download it in PDF format:


If you enjoy the free designs, tutorials, and downloads provided by BeadDiagrams.com, consider donating using Paypal!

FREE beading pattern for Coral Superduo Earrings

FREE beading pattern: Coral Superduo Earrings

Here is an earring design to coordinate with the Coral Superduo Earrings from my last post. It requires 11/0 seed beads (2 to 3 colors), and Superduo beads (1 – 2 colors, or a coordinating bead mix), plus a 6/0 or 8/0 bead to connect the ear hook via jump ring. The branches of the coraled strands (and each section of the spine) have one less seed bead than in the coraled strands of the necklace/pendant, in order to make this earring component slightly shorter (not too long).

Since these earrings are quicker to make than the necklace, I was able to experiment more with different colors and superduo bead mixes. The “organic” feel of this design lends itself well to designer superduo bead mixes in a family of colors and varying finishes (matte, gloss, textured, etc). I love how they turned out! I hope you enjoy this free beading pattern.

Click on the photos below (or the free beading pattern) to zoom in.

If you wish to print the pattern, download it in PDF format:


If you enjoy the free designs, tutorials, and downloads provided by BeadDiagrams.com, consider donating using Paypal!

FREE beading pattern for Coral Superduo Necklace

FREE beading pattern: Coral Superduo Necklace

One more design for the holidays! I was curious how superduo beads would look on a “coraled” pendant, and I love how it turned out! They resemble tri-petal florets on the end of each coral branch, and look great with either two accent colors or one. This design requires only TOHO 11/0 seed beads (two to three colors) and superduo beads (one or two accent colors).

In the red/green piece, I used a base color of silver (Permafinish galvanized aluminum TOHO 11/0) with two accent colors of red and green (requiring matching seed and superduo beads in both colors). In the purple/rose-gold piece I used a rose-gold base color with one accent color of purple (requiring purple seed and superduo beads). The last aqua/white piece was made with smaller Czech 11/0 seed beads, but the thread showed a little more on the chain part of the necklace, so I feel TOHO seed beads work slightly better with this design. The aqua/white color scheme did not have a base color – instead I just alternated the 2 colors (requiring matching seed and superduo beads in both colors).

Click on the photos below (or the free beading pattern) to zoom in.

If you wish to print the pattern, download it in PDF format:


If you enjoy the free designs, tutorials, and downloads provided by BeadDiagrams.com, consider donating using Paypal!

FREE beading pattern: Christmas Diamond Earrings

FREE beading pattern: Christmas Diamond Necklace
FREE beading pattern: Christmas Diamond Earrings

This is an earring design to coordinate with the Christmas Diamond Necklace from my last post. These earrings are much quicker to make than the necklace, which is a nice way to test different color schemes before committing to the necklace. Two sizes of bugle beads are required: #2 (5mm) green bugle beads, and #3 (7mm) red bugle beads. I made these in a different color scheme as well, using black and clear/irridescent bugles. 8/0 and 11/0 TOHO seed beads are also required, as are jump rings and ear hooks to finish them off. I hope you enjoy this free beading pattern!

Click on the photos below (or the free beading pattern) to zoom in.

If you wish to print the pattern, download it in PDF format:


If you enjoy the free designs, tutorials, and downloads provided by BeadDiagrams.com, consider donating using Paypal!

FREE beading pattern: Christmas Diamond Necklace

FREE beading pattern: Christmas Diamond Necklace

I love making geometric designs with bugle beads! This design uses two different sizes of bugle beads to create the curve in the necklace: #2 (5mm) green bugle beads, and #3 (7mm) red bugle beads. 11/0 and 8/0 seed beads are also required. (I like to use galvanized PermaFinish metallic seed beads from FireMountainGems.com, as they resist tarnishing over time). This necklace took me a while to make (so I only made one), but it was worth the patience. It is a light-weight necklace, and the way the bugles catch the light make it a stunning piece. I hope you enjoy this free beading pattern!

Click on the photos below (or the free beading pattern) to zoom in.

If you wish to print the pattern, download it in PDF format:


If you enjoy the free designs, tutorials, and downloads provided by BeadDiagrams.com, consider donating using Paypal!

FREE beading pattern for Rondelle Radiance Necklace

FREE beading pattern: Rondelle Radiance Necklace

This is the last post in my “Rondell Radiance” series, where I challenged myself to design a matching bracelet, earrings, and necklace set using a single package of rondelle crystals of different sizes.

After the Rondelle Radiance Bracelet and Earrings from my last 2 posts, I had 17 8x10mm, 3 6x8mm, 15 4x6mm, and 4 3x4mm rondelle crystals left to work with.

This necklace design requires all of the 8x10mm and 4x6mm rondelles I had left, so the only left-over crystals after this challenge are three 6x8mm and four 3x4mm rondelles… not bad! This necklace also requires 11/0 and 8/0 seed beads plus a lobster clasp and two jump rings at both ends. This design makes a 17″ necklace, but can be extended by including more of diamond-shaped “chain” links at the beginning and end.

This necklace design is made in 2 rows, but even making it with only the first row looks nice too.

FREE beading pattern: Rondelle Radiance Necklace (one row only)

Since I did not make a bracelet for the bronze/cream piece, I had extra 3x4mm rondelles to include a variation on the first row of the necklace (using 16 3x4mm rondelles instead of the 8/0 seed beads).

FREE beading pattern: Rondelle Radiance Necklace (variation)

Both variations look nice. I hope you enjoy this design series, and this free beading pattern!

Click on the photos below (or the free beading pattern) to zoom in.

If you wish to print the pattern, download it in PDF format:


If you enjoy the free designs, tutorials, and downloads provided by BeadDiagrams.com, consider donating using Paypal!

FREE beading pattern for Rondelle Radiance Earrings

FREE beading pattern: Rondelle Radiance Earrings

This is the 2nd post in my “Rondelle Radiance” series, where I challenged myself to design a matching bracelet, earrings, and necklace set using a single package of rondelle crystals of different sizes.

After the Rondelle Radiance Bracelet from my last post, I had 23 8x10mm, 9 6x8mm, 19 4x6mm, and 14 3x4mm rondelles left to work with.

I wanted to utilize all four rondelle sizes for the earrings, so this is the design I came up with. Making both earrings requires six 8x10mm, six 6x8mm, four 4x6mm, and ten 3x4mm rondelles, plus 11/0 TOHO seed beads and two 8/0 seed beads to connect ear hooks via jump rings. I hope you enjoy this design series, and this free beading pattern. Stay tuned for another upcoming free pattern for the Rondelle Radiance Necklace!

Click on the photos below (or the free beading pattern) to zoom in.

If you wish to print the pattern, download it in PDF format:


If you enjoy the free designs, tutorials, and downloads provided by BeadDiagrams.com, consider donating using Paypal!

FREE beading pattern for Rondelle Radiance Bracelet

FREE Beading pattern: Rondelle Radiance Bracelet

This design series was inspired by a sale at Michaels on rondelle crystals, packaged in four 7-inch strands of different sized rondelles (8x10mm, 6x8mm, 4x6mm, and 3x4mm). I bought them in several different colors (purple shown here). The packages varied slightly in the number of beads for each size, but generally all packages had a minimum of 23 8x10mm, 29 6x8mm, 37 4x6mm, and 54 3x4mm rondelles.

I thought it would be fun to challenge myself to design a matching bracelet, earrings, and necklace set, using all the beads in the 4 strands (or nearly all). Here is a sneak peak of what I came up with.

FREE beading pattern: Rondelle Radiance matching set
FREE beading patterns: Rondelle Radiance matching set

I will post patterns as I finish diagraming them out, but I’ll start with the bracelet (which is my first cuff bracelet design). This bracelet was too wide to close with a traditional lobster clasp, so I tried a 31mm 5-loop slide lock bar clasp (connecting via 3 jump rings to the outer and middle loops). The connection points did not line up perfectly to the loops, but that was solved by using a smaller jump ring to connect to the middle loop, and slightly larger jump rings to connect to the outside loops.

This pattern requires 20 6x8mm, 18 4x6mm, and 40 3x4mm rondelles, plus 11/0 seed beads and six 8/0 seed beads for the jump rings to go through at either end. To finish, you will need a 31mm 5-loop slide lock bar clasp with 2 smaller jump rings (~3mm) and 4 larger jump rings (~6mm). (I created the 3mm jump rings from my 6mm jump rings by snipping about half off and using round nose pliers to close it smaller). This design is constructed with alternating “main” and “secondary” rows, starting and ending with the “main” row. 10 main and 9 secondary rows will make a 7-1/2″ bracelet when using larger/TOHO 11/0 seed beads (like the purple and gold piece). It will be slightly shorter if using smaller Czech 11/0 beads (like the copper/aqua piece, which came out to 7″). I made the light blue piece with 9 main rows and 8 secondary rows for my own smaller wrist, which ended up being also 7″ using TOHO 11/0 beads. You can add alternating rows for length, as long as you end with a “main” row. I hope you enjoy this design series, and this free beading pattern!

Click on the photos below (or the free beading pattern) to zoom in.

If you wish to print the pattern, download it in PDF format:


If you enjoy the free designs, tutorials, and downloads provided by BeadDiagrams.com, consider donating using Paypal!

FREE beading pattern for Floral Butterfly Bracelet

This is a bracelet design to coordinate with the FREE beading pattern for Floral Butterfly Necklace in my last post. It requires the same materials as the necklace: Superduos and 4mm round beads of the same color (to form the mini-butterflies), and 3 colors of 11/0 seed beads: one color for diamonds (or “leaves”), one for the flower petals, and one for the flower center. You also need a clasp and jump rings to connect through the 8/0 seed bead at both ends. This bracelet pattern makes a small bracelet about 7 1/4″ long (including clasp), which can be extended by continuing the pattern to desired length, ending with an 8/0 seed bead for the jump ring to go through. I think this bracelet would also work nicely as a wrap bracelet (doubling or tripling the length).

I used 6lb Fireline for these bracelets, and found that the thread shows a tiny bit, so smoke/dark Fireline (as in the blue/green and olive/rust pieces) looked a little better than the white/crystal Fireline (in the pink/red piece). Clear thread of some kind would also probably be good. I hope you enjoy this free beading pattern!

FREE beading pattern: Floral Butterfly Bracelet

More Photos and Demo Video

Floral Butterfly Bracelet

Click on the photos below (or the free beading pattern) to zoom in.

Video Tutorial

BeadDiagrams.com has introduced video tutorials! I plan to create tutorials not only for new designs, but for some of my favorite previous designs as well. Subscribe to my YouTube channel so you can be notified when new video tutorials are posted! Leave a comment on the Discussion tab of my YouTube channel to request tutorials of any of my previous designs — I’m taking requests!

Click on the image below to view the video tutorial for this design:

Video tutorial: Floral Butterfly bracelet

PDF Download

If you wish to print the pattern, download it in PDF format:


If you enjoy the free designs, tutorials, and downloads provided by BeadDiagrams.com, consider donating using Paypal!

FREE beading pattern for Floral Butterfly Necklace

I am especially fond of this lacy spring/summer design, featuring mini-butterflies and flowers. Besides the 6/0 or 8/0 seed bead at each end for connecting a clasp via jump rings, this pattern requires only Superduos and 4mm round beads of the same color (to form the mini-butterflies), and 3 colors of 11/0 seed beads: one main color (for diamonds or “leaves”), one for the flower petals, and one for the accent (flower center and butterfly head). I found that smaller Czech 11/0 seed beads seemed to work best for the flower petals color, but really Toho will work if that’s all you have. (Delicas are not really round enough for the flowers). Slight size or shape differences in 11/0 seed beads (i.e. Czech vs. Toho) didn’t seem to matter for the other colors. Even though it takes hours to make, I liked this design so much I found myself making 3 of them, just to experiment with different color combinations!

This pattern makes a necklace about 17 inches long. If you need it longer, you can make extra diamond+flower components (steps 8 – 12) in the beginning before the first diamond-with-Superduo component (steps 2 – 3), and after the last/14th diamond-with-Superduo component. Adding an extra diamond+flower component at each end adds about an inch to the whole necklace (1/2-inch each side).

I used 6lb Fireline for these necklaces, and found that the thread shows a tiny bit, so smoke/dark Fireline (as in the blue/green and olive/rust pieces) looked a little better than the white/crystal Fireline (in the pink/red piece). Clear thread of some kind would also probably be good. I hope you enjoy this free beading pattern!

FREE beading pattern: Floral Butterfly Necklace

Click on the photos below (or the free beading pattern) to zoom in.

If you wish to print the pattern, download it in PDF format:


If you enjoy the free designs, tutorials, and downloads provided by BeadDiagrams.com, consider donating using Paypal!

FREE Beading Pattern for Bugle Butterfly Necklace

I love this new butterfly necklace design, made from #3 (7mm) bugle beads, 4mm or 6mm beads or crystals, and 8/0 and 15/0 seed beads. You can create one or more butterfly components in a string, then finish off the necklace with jump rings to attach your chain of choice. I got the idea looking at one of my older designs (Bugle Triangles Necklace), and seeing that part of the triangle component looked a bit like a butterfly wing. It took several tries to construct something that resembled a whole butterfly, and to figure out the best thread path, but I am very happy with the result. It is also fairly quick to make. I always use 6lb Fireline when working with bugles, so the thread does not break on the bugles’ edges. I hope you enjoy this free beading pattern!

FREE Beading Pattern: Bugle Butterfly Necklace

Click on the photos below (or the free beading pattern) to zoom in.

If you wish to print the pattern, download it in PDF format:


If you enjoy the free designs, tutorials, and downloads provided by BeadDiagrams.com, consider donating using Paypal!

FREE Beading Pattern for Caged Bead Earrings

This is a simple geometric design, which encases a 10mm round bead or crystal inside a cage made of #5 (12mm) bugle beads, 8/0 seed beads, and 15/0 seed beads (plus a 6/0 or 8/0 seed bead for the jump ring to go through). I had played with this simple geometric shape in the past, but had never been satisfied with the exposed sharp edges of the bugle beads, or how visible the thread was. In addition, the bugles would shift around the joints (where the 4 bugle edges come together), making it uneven. I then came up with the idea of covering each joint with a 8/0 and 15/0 seed bead to both cover the sharp edges and hide the thread. At first, I struggled with finding a thread path that would not go through the 15/0 seed beads too many times. After many tries, I found the best solution was to construct the entire bead cage first, then cover the joints at the end (as opposed to trying to incorporate them while building the cage). The 8/0 seed beads also served to stabilize the joints from shifting around, which was a bonus. After I nailed down this method, I was able to quickly make many of them to try different color combinations. I hope you enjoy this free beading pattern!

FREE Beading pattern: Caged Bead Earrings

Click on the photos below (or the free beading pattern) to zoom in.

If you wish to print the pattern, download it in PDF format:


If you enjoy the free designs, tutorials, and downloads provided by BeadDiagrams.com, consider donating using Paypal!

© 2026 BeadDiagrams.com

Theme by Anders NorenUp ↑

Ads Blocker Image Powered by Code Help Pro

Ads Blocker Detected!!!

We have detected that you are using extensions to block ads. Please support us by disabling these ads blocker.

Powered By
Best Wordpress Adblock Detecting Plugin | CHP Adblock