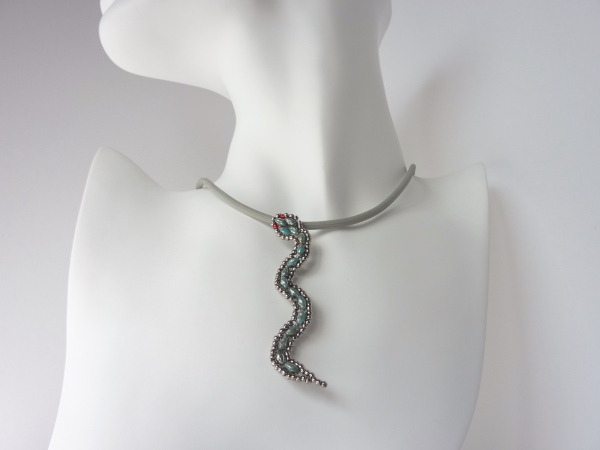
Enjoy a free video tutorial to accompany the PDF instructional diagram for this Snake Pendant design. After playing around with different methods to stitch curves with superduos and seed beads, I developed this cute pattern for a Snake Pendant. It has a beaded loop in the back as a hidden bail, so no jump rings are needed. I liked how superduos with a varied finish (like Picasso or Chalk) looked the best. I hope you enjoy this free beading pattern!
Materials
This pendant only requires sixteen superduo beads and 11/0 TOHO seed beads (two seed beads in a different color for the eyes – I used red). Photos below of the green snake pendant show how the back of the pendant has a beaded loop to act as a hidden bail. There’s no need for jump rings or bail findings for this pendant, just the cord or chain it will hang on.
More Photos and Demo Video
Click on the photos below (or the free beading pattern) to zoom in.
Video Tutorial
BeadDiagrams.com has introduced video tutorials! BeadDiagrams.com tutorials have an advantage over other video tutorials, offering a printable PDF to accompany each tutorial, to help and follow along with. Subscribe to my YouTube channel (https://youtube.com/c/BeadDiagramsTutorials) to be notified of new tutorials. I am not only posting tutorials for new designs, but also for previously posted designs!
Click on the image below to view the video tutorial for this design:
Video Tutorial: Snake Pendant
Download PDF
If you wish to print the pattern, download it in PDF format:
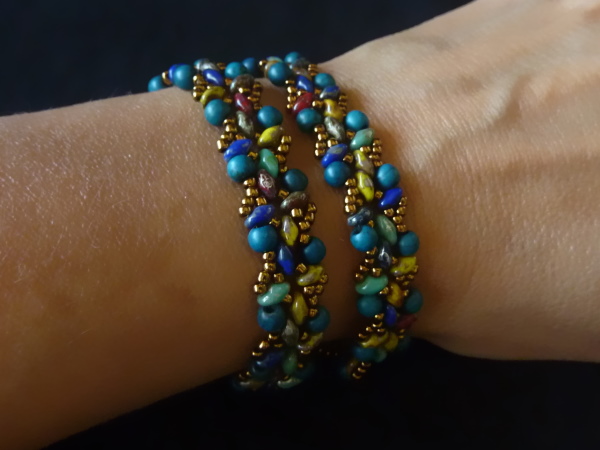
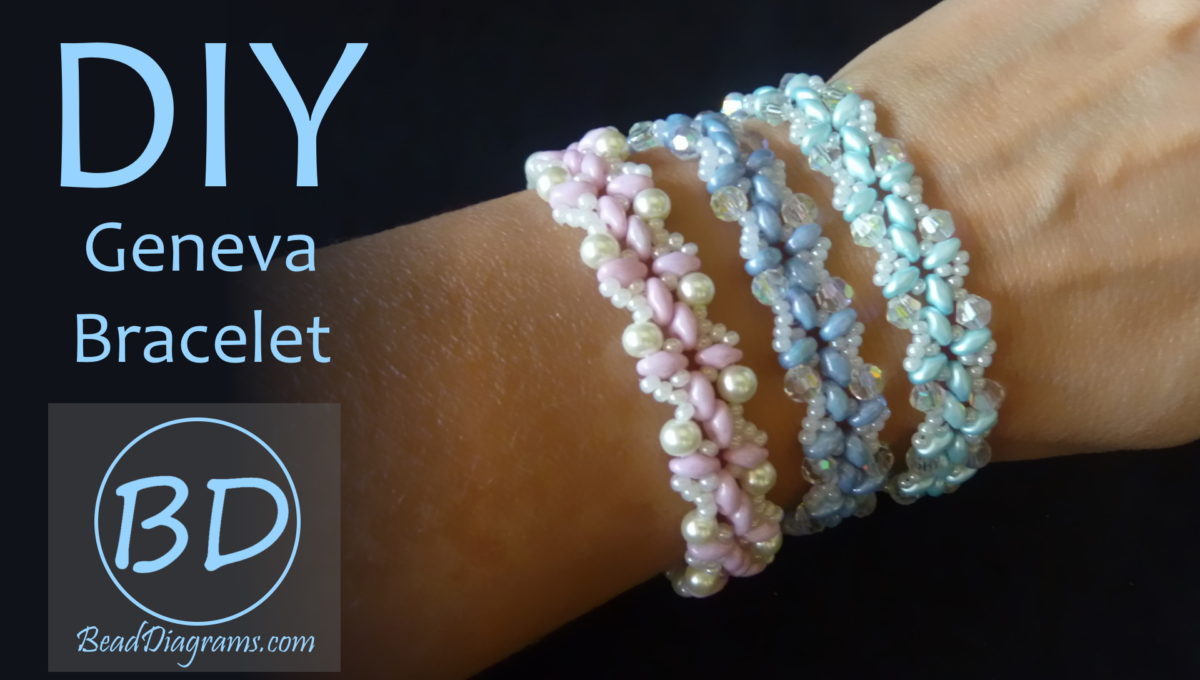
Enjoy a free step-by-step video tutorial to accompany the free PDF diagram for this design! I loved this bracelet so much I couldn’t stop making it. Experimenting with different color combinations was fun, especially since this bracelet is so quick and easy to make. My favorite ended up being the one I thought I would like the least, which is the piece shown above (made with multi-colored stone-like colors and bronze seed beads). This bracelet is versatile in that you can use any round 11/0 seed bead (TOHO or Czech), and any 4mm bead (crystals, round, bicone, etc) with your superduos. This bracelet also works very well as a wrap bracelet if you double or triple the length. (I doubled it in the example above). I hope you enjoy this free beading pattern!
Materials
As mentioned above, this piece requires round 11/0 seed bead (TOHO or Czech), 4mm beads (pearls, round crystals, bicones, etc.), and superduos. You will need about 28 4mm beads to make a 6.5-inch bracelet (7 inches when you include the clasp), or more if you want it longer. I use about 1 yard or meter of 6-lb Fireline as the thread for a single-strand bracelet. The white/gold piece, and the multi-colored piece were made with TOHO seed beads, and the rest with Czech. Here is a complete list of materials used in the bracelets shown here:
Superduos
4mm Beads
Seed Beads
Multi-colored
Raku Mix from Hobby Lobby
Dyed Magnesite 4mm round (from Fire Mountain Gems)
Click on the photos below (or the free beading pattern) to zoom in.
Video Tutorial
BeadDiagrams.com has introduced video tutorials! BeadDiagrams.com tutorials have an advantage over other video tutorials, offering a printable PDF to accompany each tutorial, to help and follow along with. Subscribe to my YouTube channel (https://youtube.com/c/BeadDiagramsTutorials) to be notified of new tutorials. I am not only posting tutorials for new designs, but also for previously posted designs!
Click on the image below to view the video tutorial for this design:
Video Tutorial: Geneva Bracelet
Download PDF
If you wish to print the pattern, download it in PDF format:
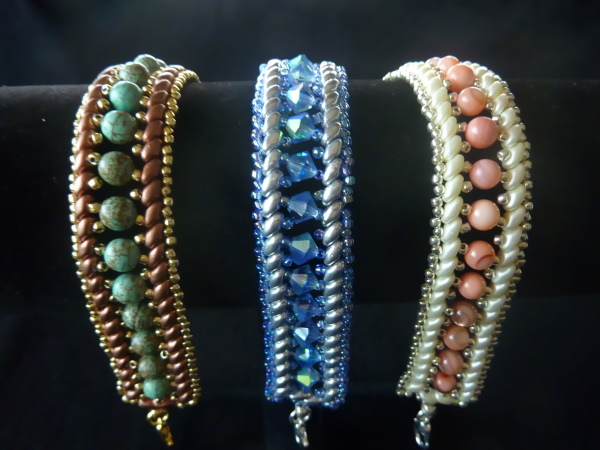
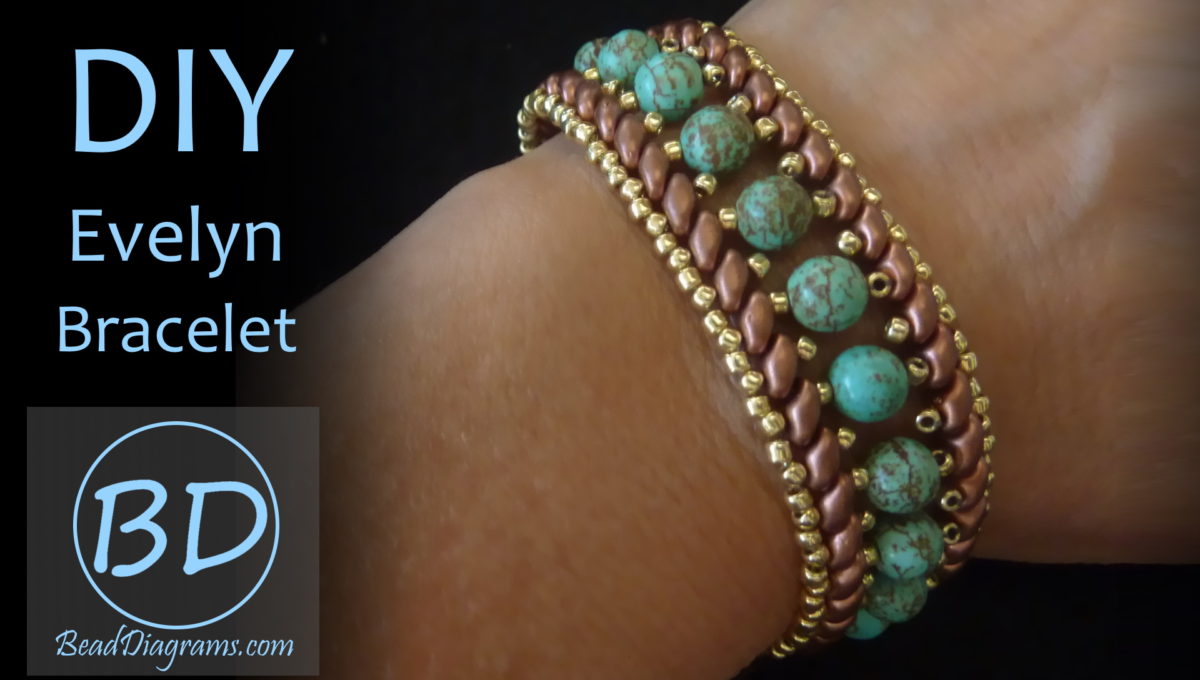
Enjoy a video tutorial to accompany the free PDF download for this design! This bracelet is designed to coordinate with the Evelyn Necklace from my previous post. Along with superduos, the pattern works with any 11/0 seed bead, and any round bead or crystal as long as it is 6mm. This versatility allows for endless color combinations, which makes this a fun bracelet to make. I hope you enjoy this free beading pattern!
Materials
For this bracelet, you need 11/0 seed beads (any kind, Czech, TOHO, etc), superduos, and 6mm beads or crystals (19 – 22 of them, depending on how long you want the bracelet to be). You will also need two 6/0 or 8/0 seed beads at either end to connect the clasp with jump rings.
More Photos and Demo Video
Click on the photos below (or the free beading pattern) to zoom in.
Video Tutorial
BeadDiagrams.com has introduced video tutorials! BeadDiagrams.com tutorials have an advantage over other video tutorials, offering a printable PDF to accompany each tutorial, to help and follow along with. Subscribe to my YouTube channel (https://youtube.com/c/BeadDiagramsTutorials) to be notified of new tutorials. I am not only posting tutorials for new designs, but also for previously posted designs!
Click on the image below to view the video tutorial for this design:
Video Tutorial: Evelyn Bracelet
Download PDF
If you wish to print the pattern, download it in PDF format:
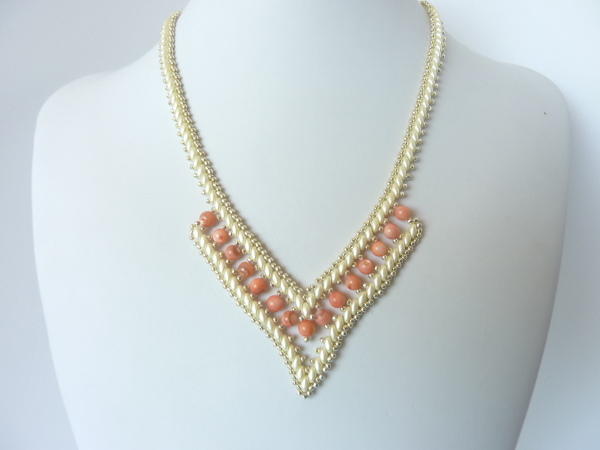
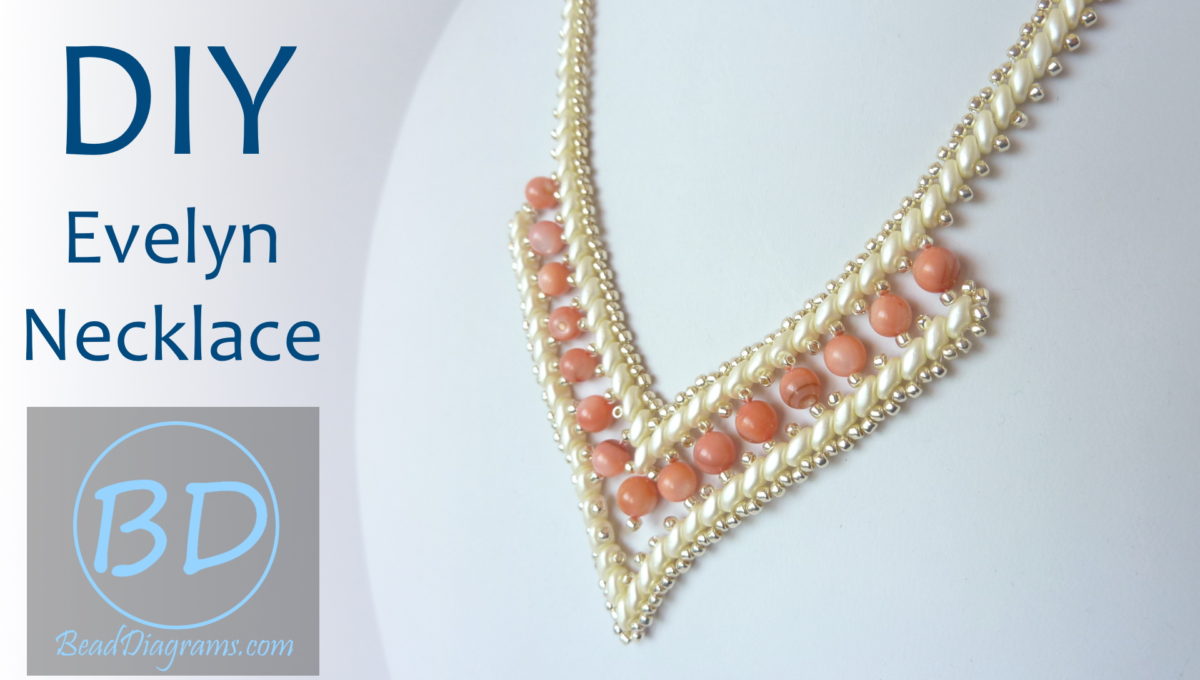
Enjoy a step-by-step video tutorial to accompany the PDF diagram for this design. This is a simple but elegant necklace design that is versatile. The angle of the “V” is flexible enough to support a longer necklace with deeper “V” angle, or a shorter necklace with wider “V”. You can also change the length of the “V” to be shorter or longer or use cyrstals instead of round beads or pearls. I had fun experimenting with different color combinations. I hope you enjoy this free beading pattern!
Materials
For this necklace, you need 11/0 seed beads (any kind, Czech, TOHO, etc), superduos, and 6mm beads or crystals (15 – 23 of them, depending on how long you want to make the “V” section). I used 7mm beads for the blue/bronze piece below, and that also worked with this pattern. You will also need two 6/0 or 8/0 seed beads at either end to connect the clasp with jump rings.
More Photos and Demo Video
Click on the photos below (or the free beading pattern) to zoom in.
Video Tutorial
BeadDiagrams.com has introduced video tutorials! BeadDiagrams.com tutorials have an advantage over other video tutorials, offering a printable PDF to accompany each tutorial, to help and follow along with. Subscribe to my YouTube channel (https://youtube.com/c/BeadDiagramsTutorials) to be notified of new tutorials. I am not only posting tutorials for new designs, but also for previously posted designs!
Click on the image below to view the video tutorial for this design:
Video Tutorial: Evelyn Necklace
Download PDF
If you wish to print the pattern, download it in PDF format:
Click on the photos below (or the free beading pattern) to zoom in.
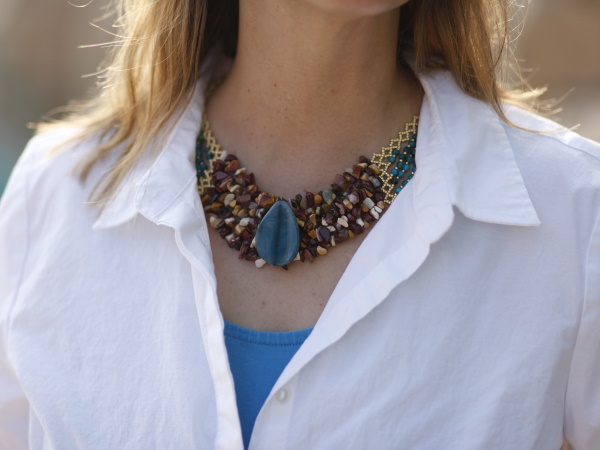
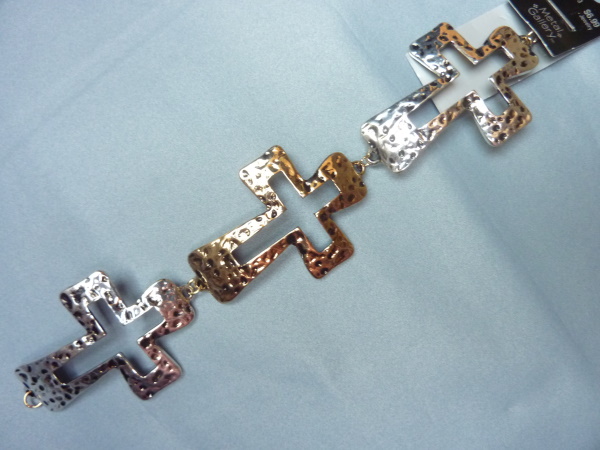
The original inspiration for this piece was a sale at Hobby Lobby, specifically this Metal Gallery piece:
I thought this would be great as a focal point, with some natural stone. I have both drilled medium chips and round beads made of natural stone, so wanted to incorporate those somehow. I thought having the chips as a backdrop to the focal piece would be great, but they are too heavy to make an entire necklace out of with enough width for the focal piece to lay on top of. Plus I only had 30 inches or so of each chip variety. So what I finally came up with was more of a method than a pattern, which is easier to show with a mix of pictures and diagrams. Usually my PDF patterns are 1 page, but this one is 5 pages, to illustrate this method with images.
This pattern requires two 8/0 seed beads and jump rings for clasp, 11/0 seed beads, 4-mm round beads, 30-inches of medium drilled chip beads, and (optionally) a 1 1/2″ focal piece or bead (with 5 inches of 20-guage wire to attach).
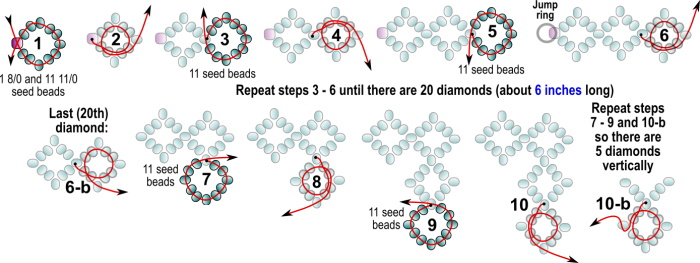
I started by making 2 end pieces (each in an L-shape) to frame the center chip section (shown in steps 1 – 10 below).
Steps 1 – 10
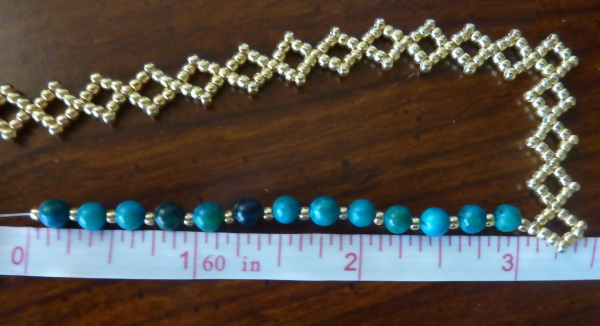
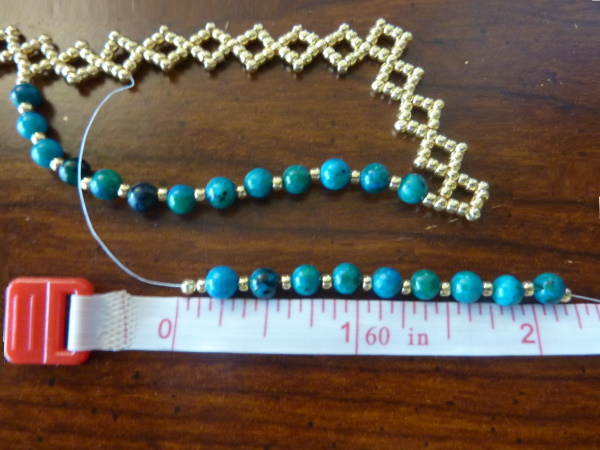
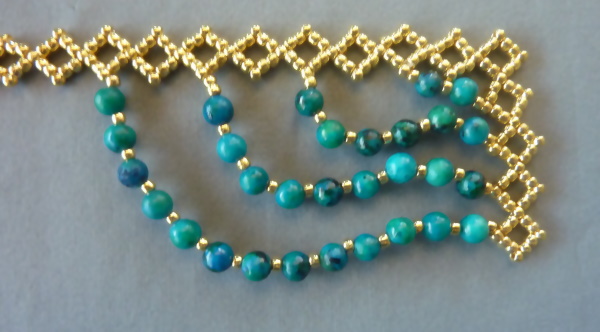
Then I added some decorative stability strands (with accent color), so the end components would keep their shape with the weight of the chips added later. The first outer strand is made of alternating 4mm round beads and seed beads, and should measure 3″ – 3 1/16″ long, connecting from the last vertical diamond, to the 9th horizontal diamond from the right. This ended up being 13 round beads for the aqua/gold piece pictured below, but 14 for the blue/silver piece (as the size of 4mm beads can vary).
Step 11
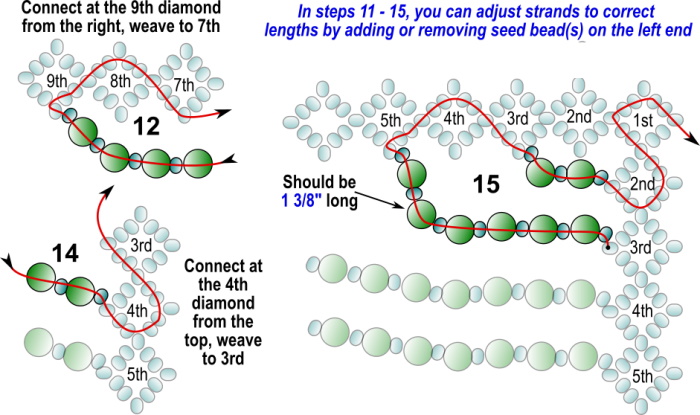
Connect the strand at the 9th horizontal diamond from the right (see diagram below, step 12). After step 12, the 2nd strand should measure 2 1/4″, and connect from the 7th horizontal diamond from the right to the 4th vertical diamond. This ending up being 9 round beads for the aqua/gold piece pictured below, but 10 for the blue/silver piece. (I adjusted the strand to the right length by adding an extra seed bead on the end, which can be done with any of the strands).
Steps 12, 14, and 15Step 13
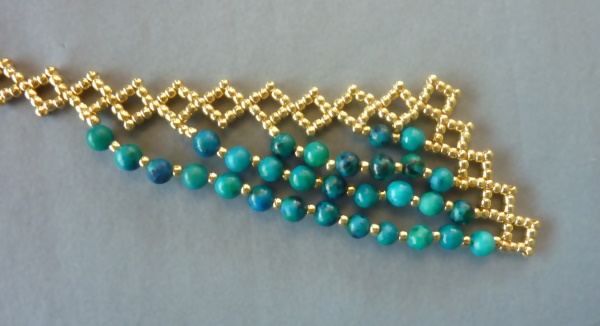
When diamond links are at 90 degrees, the 3 longer strands will have some slack.
When you pull it apart past 90 degrees (as the gravity of the chip beads will do), the four strands should all be straight.
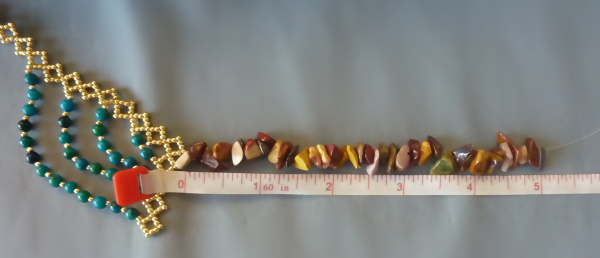
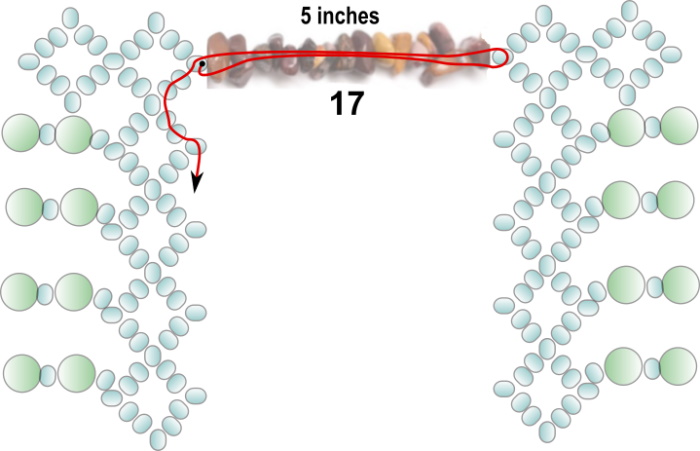
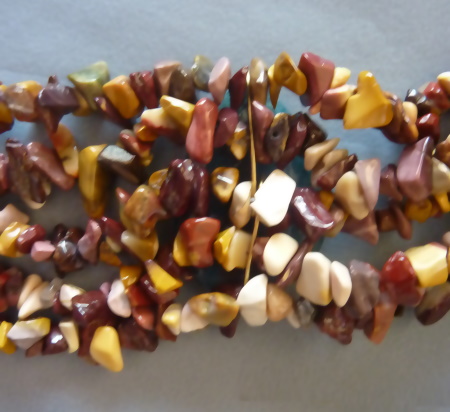
Next, string on 5 inches of chips.
Step 16
Connect it to the other end component, per diagram below:
Step 17
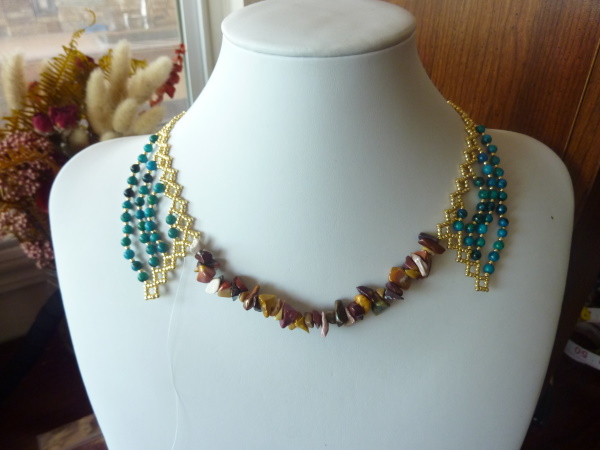
After connecting first row of chips, connect clasp with jump rings through 8/0 seed beads at either end, and place on a necklace display bust. (The weight of the chips can affect how long each of the next four chip strands will be, so it is good to finish the necklace while it is on the display bust).
Before step 18 (1st strand of chips)
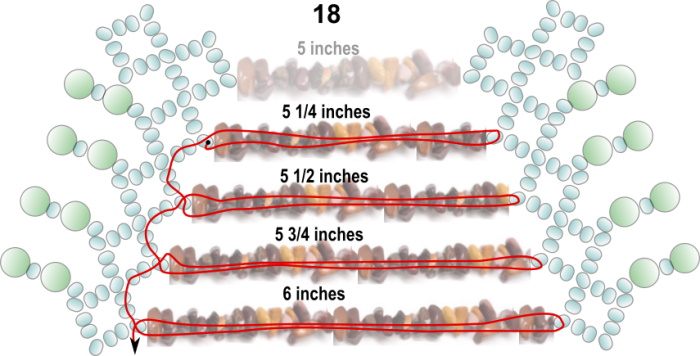
As you add chip strands, ensure they are the right length so they lie close together without gaps or overlapping. (Step 18 indicates what these lengths were for my chips).
Step 18 (2nd strand of chips)Step 18
After the 5th strand, the weight of the chips will pull the end component strands straight. This can be the finished necklace, or you can continue to add a focal piece on top of the chips.
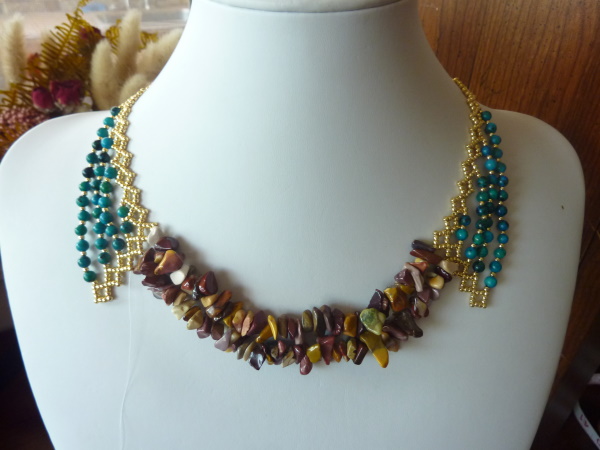
Finished chip section (after step 18)
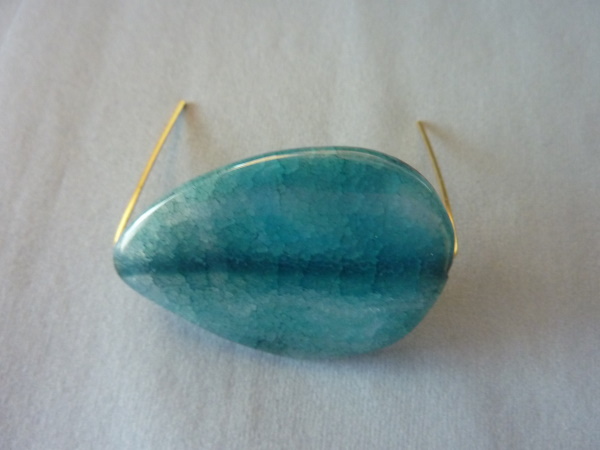
For the focal piece, first put about 5 inches of 20-guage wire through the focal bead, and bend the ends 90 degrees back on both sides.
Step 19
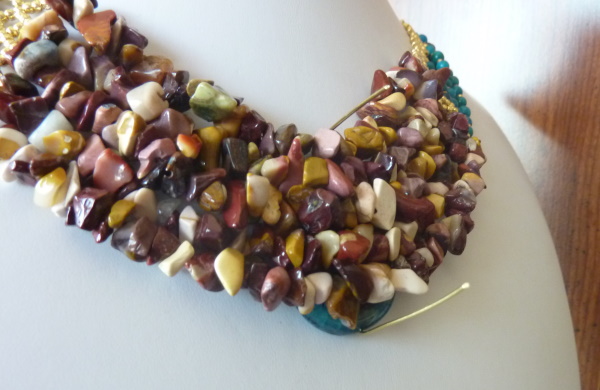
Put the necklace on the display bust backwards, then place the focal bead behind it. Be sure it is in the center.
Step 20
Bend the wires down with your thumbs, in between the chip beads. Use round nose pliers to curl the wire ends inward so they don’t poke out.
Step 21
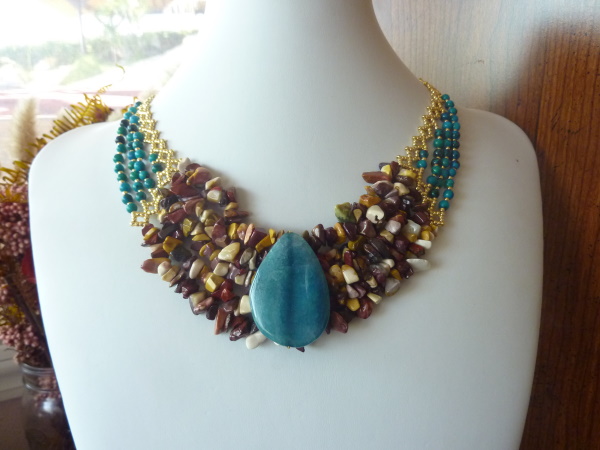
Put the necklace back on the display bust frontward, showing the focal piece. Enjoy the finished piece!
Chip Statement Necklace
If you wish to print the pattern, download it in PDF format: